

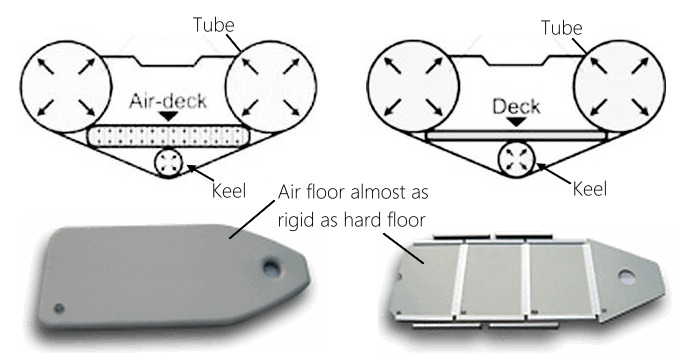
The high-pressure air floor of an inflatable boat offers remarkable rigidity once fully inflated, akin to a traditional plywood floor. This rigidity allows you to stand, walk, and even jump on it, just as you would on a plywood floor.
For those who anticipate frequent inflation and deflation of their boat, the air floor stands out as the ideal choice due to its compact folding capability. Assembling an inflatable boat with an air floor is a straightforward process, simply roll it out and inflate, making it hassle-free compared to assembling a plywood floor.
While plywood floors are suitable for boats that remain inflated most of the time, they come with added weight and are more cumbersome to handle. In contrast, the air floor’s lighter weight not only makes assembly easier but also contributes to the boat’s ability to achieve higher speeds more effortlessly than a plywood floor would allow.
Moreover, the air floor offers superior comfort as it is gentler on your knees and absorbs vibrations more effectively than a rigid plywood floor. These advantages make air floors a popular choice among our customers.
Our air floors are designed with a patented plywood support above the keel in the bow section of the boat. This unique feature enhances the rigidity and flatness of the air floor, resulting in optimal performance. Unlike some competing brands with bent air floors, our flat air floors deliver superior performance and stability on the water.
- The SD260 comfortably seats 1-2 people.
- The SD290/330 accommodates 2-3 people.
- The SD365/385 can comfortably seat 3-4 people.
- The SD430 is designed for 4-5 people.
- If you store the boat on a trailer or dock, a hard floor is not an issue.
- For those who keep the boat in their car’s trunk and inflate it for a day of fishing, an air deck floor is easier to manage due to its lighter weight and quicker assembly.
|
Selection recommendation charge based on intended activity: |
|||||
| inflatable kayak | inflatable boat 7-9′ | inflatable boat 11-12′ | inflatable boat 13-15′ | inflatable river raft | |
| Yacht Tender | fair | excellent | good | good | |
| Exploring Harbors & Bays | good | good | good | excellent | |
| Coastal Areas Exploration | fair | fair | excellent | excellent | |
| Beach Cruising & Camping | excellent | fair | good | excellent | |
| Scuba In Shore | good | good | excellent | fair | |
| Scuba Off Shore | good | excellent | |||
| Fishing Ponds & Streams | good | excellent | fair | fair | fair |
| Fishing Lakes & Rivers | good | excellent | good | excellent | good |
| Saltwater Game Fishing | good | excellent | |||
| Duck Hunting | good | excellent | |||
| River Rafting | excellent | good | fair | fair | excellent |
| Lifesaving | good | good | good | ||
| Splashing around | excellent | fair | fair | fair | |
Inflatable boats primarily come in two fabric types: PVC and Hypalon (now sold as CSM, after being discontinued by its original manufacturer, Dupont). Each type has its advantages and considerations, especially regarding durability and resistance to environmental factors.
PVC Fabric:
- Advantages (Pro): PVC is notably less expensive than Hypalon/CSM, making boats made of this material more affordable.
- Disadvantages (Con): However, PVC doesn’t withstand prolonged exposure to direct sunlight as well as Hypalon/CSM. Without protection, PVC fabric can fade and become sticky over time when exposed to sunlight. It’s also less tolerant of substances like sunscreen and insect repellent compared to Hypalon/CSM.
Hypalon/CSM Fabric:
- Advantages (Pro): Hypalon/CSM boasts superior durability, especially when exposed to extended periods of direct sunlight. It can withstand fuel spills, sunscreen, insect repellent, and exhaust fumes better than PVC.
- Disadvantages (Con): The main drawback is the higher cost compared to PVC, making Hypalon/CSM boats a more significant investment.
In summary, if your inflatable boat will be subjected to prolonged periods of direct sunlight without protective measures like a boat cover or UV protectant, Hypalon/CSM is likely to last longer and maintain its quality better than PVC. However, for occasional use such as weekends or vacations, or if you can protect the boat from sunlight when not in use, PVC remains a viable and cost-effective choice.
The key takeaway is that exposure to direct sunlight is a crucial factor in determining the longevity of PVC boats. Regular use without prolonged exposure to sunlight won’t pose significant issues. For boats left outdoors all year, a simple solution like covering the boat with a tarp or using a boat cover when not in use can mitigate the effects of sunlight and prolong the life of the PVC fabric.
Please visit the Hard Floor Assembly page if you have difficulties installing your plywood floor into your inflatable boat. You may also download a Plywood Floor Assembly manual.
In the event of a puncture in an inflatable boat, raft, or kayak, it’s important to remain calm and understand the safety features designed into these vessels. Most inflatable watercraft are equipped with multiple air chambers, typically separated by internal baffles. This design ensures that even if one chamber is punctured and loses air, the remaining chambers maintain enough buoyancy to keep the boat afloat.
The presence of multiple air chambers serves as a critical safety feature. It prevents a single puncture from causing the entire vessel to sink, providing a level of redundancy and stability on the water. This feature is particularly beneficial in emergency situations, as it allows occupants time to address the issue without immediate risk of capsizing or sinking.
It’s worth noting that the buoyancy of the remaining air chambers may vary depending on the size and design of the inflatable watercraft. Larger boats or those specifically designed for rough waters may have more chambers to ensure greater safety and stability.
Overall, understanding the presence of multiple air chambers and their buoyancy capabilities should provide reassurance to users of inflatable boats, rafts, and kayaks. In the rare event of a puncture, remaining calm and following appropriate safety procedures will help ensure a safe and controlled response to the situation.
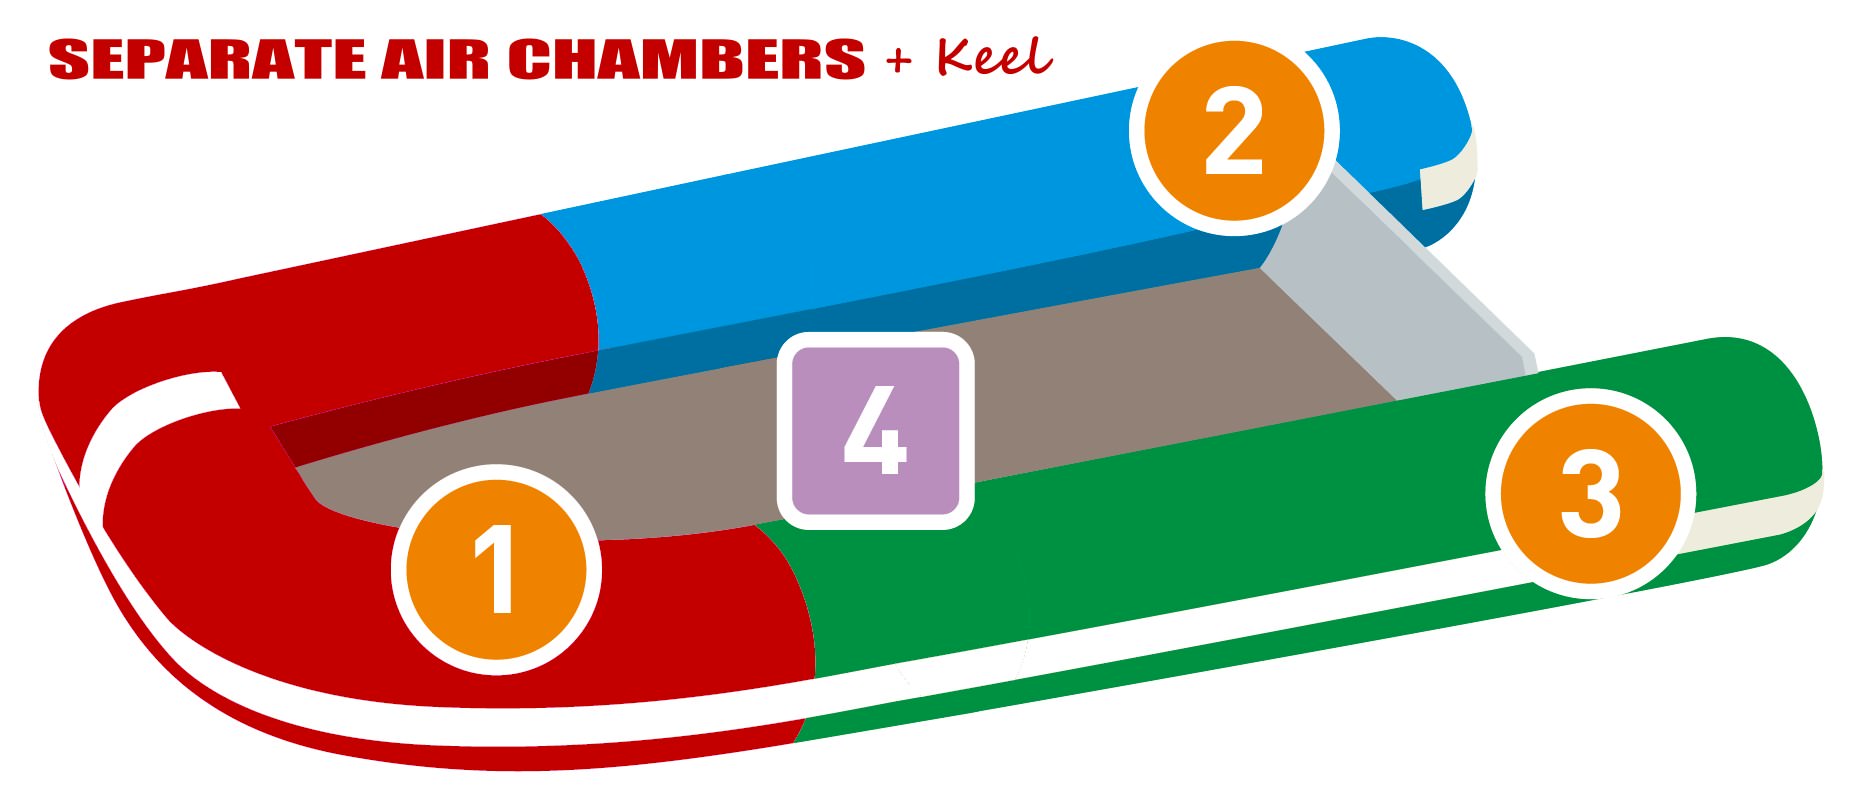
Inflatable watercraft utilize internal baffles to separate the air chambers, ensuring that each chamber remains independent in the event of an accidental puncture. These baffles serve a crucial role in maintaining buoyancy and stability, as they prevent a single puncture from compromising the entire structure. Additionally, these baffles are designed to equalize air pressure between all interconnected chambers, contributing to the overall balance and performance of the inflatable craft.
For safety and preparedness while out on the water, we strongly recommend keeping the following items on board your inflatable boat:
– Personal Flotation Devices (PFDs) for each passenger, along with a whistle for signaling in emergencies.
– A marine emergency radio to communicate with the Coast Guard or other authorities if assistance is needed.
– A reliable hand pump for inflating or re-inflating air chambers as necessary.
– A piece of durable duct tape, such as Gorilla Tape, for temporary emergency repairs.
– A small bottle of acetone to clean and prepare surfaces before applying tape for a secure seal.
In the unfortunate event of a puncture below the waterline, immediate action can help mitigate the situation. Using a hand pump to slow down the air leak can buy valuable time while assessing the damage and planning the next steps. Quick emergency repair solutions, such as the ClamSeal, are designed specifically for ripped inflatables and can provide temporary relief until a more permanent solution can be implemented.
Accessible punctures inside the boat can also be addressed temporarily using duct tape, Flex Tape, or Gorilla Tape. Prior to applying the tape, it’s crucial to clean the area around the puncture with acetone to ensure a strong and reliable seal. Once the tape is applied, inflating the affected chamber can further reduce air loss, allowing you to safely navigate to shore for proper repairs.
By following these safety recommendations and having the necessary equipment on board, you can enhance your preparedness and response capabilities in the event of punctures or emergencies while enjoying your inflatable watercraft.
The lifespan of your inflatable boat depends largely on how well you care for it. With proper maintenance, it’s possible for your boat to last anywhere from 5 to 10 years. However, neglect and improper handling can significantly reduce its longevity, potentially limiting its lifespan to just the duration of its warranty. It’s important to note that boats that have been abused or mishandled are typically not covered under warranty.
To ensure your PVC inflatable products stand the test of time, consider the following care guidelines:
Storage: Store your PVC inflatable boat in a well-ventilated and shaded area when not in use. Avoid storing it in closed containers, boxes, or areas with no ventilation, especially under direct sunlight. Humidity and heat can weaken the chemical bond of PVC glue used in assembly, leading to potential issues over time.
Humidity Management: Closed storage areas can accumulate humidity, which can further deteriorate the boat’s materials. Proper ventilation helps prevent this buildup and maintains the integrity of the PVC fabric and adhesive bonds.
UV Protection: Direct exposure to sunlight and UV rays is a common cause of premature aging in inflatable boats. This exposure can lead to fabric discoloration, fading, and damage to varnished plywood components. Using a boat cover or storing the boat in a shaded area can help mitigate these effects.
For more comprehensive guidance on selecting, caring for, repairing, and handling inflatable boats, consider referring to the book “INFLATABLE BOATS – Selection, Care, Repair, and Seamanship” by Jim Trefethen. You can find this book with the ISBN number 0-07-065252-X on platforms like www.amazon.com or by directly ordering from the publisher, The McGraw-Hill Companies, at 1-800-262-4729.
By following these care recommendations and investing in educational resources like the mentioned book, you can extend the lifetime of your inflatable boat and enjoy it for years to come while minimizing potential issues related to sun exposure and environmental factors.
Maintaining the longevity and quality of your inflatable boat is straightforward if you follow these detailed steps:
Cover or Deflate When Not in Use: One of the simplest yet most effective ways to protect your inflatable boat is to cover it or deflate it when it’s not in use. Leaving inflatables exposed to the sun, especially in local marinas or harbors, can lead to premature degradation. If feasible, deflate the boat, clean it thoroughly to remove any dirt or debris, and store it in its designated carry bag or storage container. This practice not only shields the boat from damaging UV rays but also prevents dirt buildup that can contribute to wear and tear over time.
Avoid Prolonged Exposure: Inflatable boats left exposed to the elements, particularly harsh sunlight, are at risk of deterioration. Many inflatables suffer from accelerated aging and degradation when left out in local marinas or harbors without adequate protection. By covering the boat or deflating it and storing it properly, you can significantly extend its lifespan and maintain its structural integrity.
Thorough Cleaning: Regularly clean your inflatable boat to remove dirt, salt, and other contaminants that can cause damage or discoloration. Use mild soap and water or a recommended boat cleaner suitable for inflatable materials. Pay attention to areas prone to dirt buildup, such as seams and creases. After cleaning, ensure the boat is completely dry before storing it to prevent mold or mildew growth.
Proper Storage: Store your inflatable boat in a cool, dry, and well-ventilated area when not in use. Avoid storing it in direct sunlight or in areas with high humidity, as these conditions can accelerate degradation and promote mold growth. If possible, use a boat cover or protective tarp to shield the boat from UV rays and environmental elements.
To ensure the longevity of your SATURN inflatable boat, it’s crucial to avoid certain practices that can accelerate wear and deterioration. If your boat is constantly towed behind a sailboat, left exposed year-round on a dock, or neglected in terms of cleanliness and UV protection, its lifespan will inevitably be shortened. These factors, combined with exposure to harmful UV rays, can lead to premature aging and damage to the boat’s materials.
To mitigate these risks and extend the life of your SATURN inflatable boat:
Use a Boat Cover or Tarp: Whenever possible, use a boat cover or a protective tarp to shield your boat from direct sunlight and environmental elements. This simple measure can significantly prolong the boat’s lifespan by reducing UV exposure and minimizing the effects of weathering.
Maintain Cleanliness: Keep your boat clean and free of dirt, salt, and debris. Regularly rinse the boat with fresh water after use to remove any residues that could cause discoloration or deterioration. Avoid using chemical detergents or harsh cleaners that may damage the fabric. Instead, opt for boat cleaners specifically designed for inflatable materials, such as those available from Inland Marine USA.
Avoid Sunscreen Lotions: Be mindful of using sunscreen lotions or other skincare products that may contain ingredients harmful to the boat’s fabric. Some chemicals in these products can cause discoloration or make the fabric sticky over time. If sunscreen is applied, ensure that the boat tubes are cleaned promptly to prevent any adverse effects.
Choose Recommended Cleaners: When cleaning your boat, use boat cleaners recommended by reputable sources, such as Inland Marine USA. These cleaners are formulated to be safe and effective for use on inflatable materials, ensuring that your boat remains in top condition without causing damage or degradation.
When it comes to cleaning your inflatable boat, it’s crucial to use cleaning solutions that are specifically approved for PVC fabrics. Avoid using household cleaners like CLOROX or Windex, as well as any other chemicals not intended for use on inflatable materials. These types of cleaners can cause the PVC fabric to become sticky over time, leading to potential issues and deterioration.
Additionally, be cautious when using sunscreen lotions, as some formulations may contain silicon or other ingredients that can also make the PVC fabric sticky. If sunscreen is applied to the boat, make sure to thoroughly clean the boat tubes to remove any lotion marks or residues. This simple step can help extend the life cycle of the boat fabric and prevent unwanted stickiness.
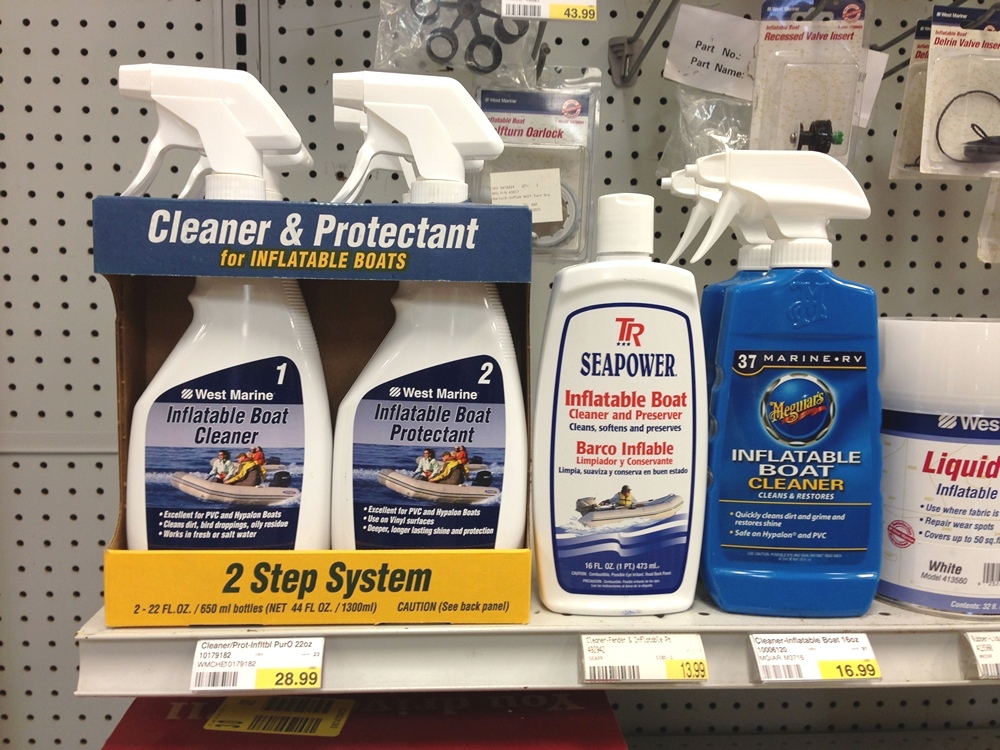
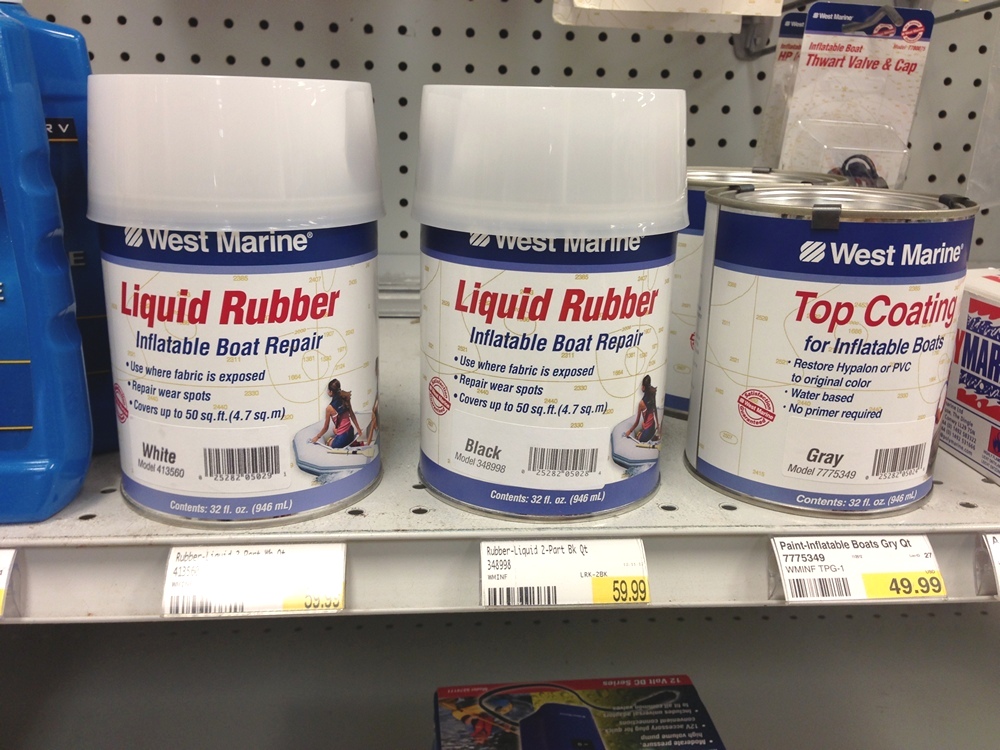
For cleaning and maintaining your inflatable boat, consider visiting your local West Marine store. They typically carry a variety of inflatable boat cleaners, protectants, and boat paints that are specially formulated and approved for use on PVC fabrics. These products are designed to effectively clean and protect your boat without causing damage or undesirable effects.
By using approved cleaning solutions and products designed specifically for PVC fabrics, you can ensure that your inflatable boat remains in excellent condition for years to come. Proper care and maintenance play a key role in preserving the integrity, appearance, and performance of your boat, allowing you to enjoy many memorable adventures on the water.
We highly recommend using Swipes Wipes for cleaning inflatable boats due to their exceptional cleaning solution specifically formulated for such boats. These wipes offer a convenient way to maintain and protect your inflatable boat’s surface. They effectively eliminate various types of dirt, grime, and residue while providing protection against harmful UV rays that can degrade the boat’s material over time.
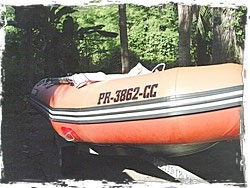
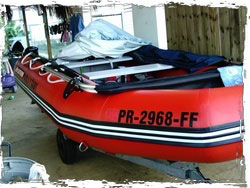
To illustrate the effectiveness of Swipes Wipes, consider the following scenario involving two identical Saturn boats that were purchased simultaneously and owned by different customers in Puerto Rico, each subjected to different maintenance practices:
The first boat, left uncovered and exposed to the elements over four years, likely accumulated dirt, dust, and environmental debris. Without proper protection, UV rays could have also caused gradual damage to the boat’s surface, leading to discoloration and potential material weakening.
On the other hand, the second boat was diligently maintained. It underwent regular cleaning using Swipes Wipes, which not only removed accumulated dirt but also formed a protective barrier against UV rays. Additionally, this boat was covered with a boat cover when not in use, further shielding it from direct sunlight and harsh weather conditions.
As a result of these contrasting maintenance approaches, the difference in appearance and condition between the two boats is significant. The boat that received regular cleaning and protection appears almost new, with a well-maintained surface that reflects its care and attention to detail. In contrast, the uncovered boat likely shows visible signs of wear, including faded colors, surface blemishes, and potentially compromised material integrity.
In conclusion, Swipes Wipes offer a practical solution for inflatable boat owners, helping them preserve the aesthetics and longevity of their watercraft. By incorporating these wipes into a regular maintenance routine and using proper protective measures such as boat covers, owners can enjoy their boats for years to come while minimizing the effects of environmental wear and tear.
 |  |
When comparing the two Saturn boats in Puerto Rico, the one that was covered and diligently maintained with Swipes Wipes stands out as the well-preserved vessel. Its surface remains vibrant and free from the signs of aging that often result from prolonged exposure to the elements, such as UV rays, dirt, and moisture.
In contrast, the uncovered boat displays the consequences of prolonged sun exposure and neglect. Its once-bold colors may have faded, the surface could be marred by dirt and grime, and there may be signs of material degradation due to UV rays.
For our friends and customers in hot and humid regions like South Florida, Texas, and LA, it’s crucial to understand the impact of environmental conditions on inflatable boats. Garages, especially in summer, can become extremely hot, exceeding 100 degrees Fahrenheit, and the prolonged humidity can further accelerate damage to inflatable boat materials.
Saturn advises owners to take proactive measures to protect their inflatable boats. This includes covering the boat when not in use to shield it from direct sunlight and humidity. Additionally, deflating the boat for storage in a climate-controlled area within the home can prevent the detrimental effects of heat and moisture buildup.
It’s also essential to release excess pressure from the boat’s tubes and floor before storage, as heat can cause the air inside the vessel to expand, potentially leading to burst seams. These precautions may seem minor but can significantly extend the lifespan of inflatable boats, ensuring they remain in optimal condition for years beyond their warranty period.
Taking proper care of your inflatable boat can yield long-term benefits, potentially extending its usability well beyond a decade. An example of this longevity can be seen in a Craigslist ad from March 2015, showcasing a 2003 Saturn inflatable boat still in excellent condition after over ten years of use—a testament to the benefits of diligent maintenance and protective measures.
To register your vessel for use with an outboard motor, several essential documents are required: a Manufacturer Certificate of Origin (MCO), a Bill of Sale (BOS), and an invoice demonstrating the amount paid. These documents are typically included inside the shipping box when you purchase your vessel. Once registered, you will receive the title by mail.
Should any of these vital documents be missing, replacements can be obtained from the Downloads page on our website at https://inflatableboat.net/. On this page, you will also find an example detailing how to correctly fill out the MCO and BOS forms. It’s crucial to fill in all necessary information by hand using a pen, including the purchase price, your name, address, and the date of purchase. If you have any questions during this process, feel free to email us for assistance.
When filling out the MCO and BOS, be sure to include the vessel’s length, width, and year, which can be determined from the last two digits of the Hull Identification Number (HIN). The HIN number itself can be found on the transom of your vessel, on a PVC strip glued to its side, or on the side of the shipping box below the model number. The HIN number should begin with the letters “VEJ.”
It’s important not to bring blank forms to the registration office, as they will not be accepted. All forms must be completed before visiting the registration office. If you encounter difficulties with handwriting, we are more than happy to fill out the forms for you.
Notably, the section requiring notarization should be left blank on the MCO form unless you are selling your boat to a private buyer who will register it for the first time. Notarization is not necessary for registration if you purchased your boat from BoatsToGo, as we are a manufacturer registered with the US Coast Guard.
If a registration office insists on notarization despite proper documentation, we can provide a notarized copy of the Manufacturer’s Statement of Origin (MSO) for a fee of $40. You can make this payment at https://inflatableboat.net/.
In cases where registration is challenging due to specific office requirements or issues with the paperwork’s legibility, such as requiring “wet” hand signatures, consider visiting a different tag agency or window within the same agency. Different agencies may have varying interpretations of registration requirements.
If your registration is rejected for any reason, including the need for manual signatures or printing issues, contact us, and we will promptly mail you new registration documents with hand signatures. We are committed to ensuring a smooth registration process for our customers.
Saturn inflatable boats and rafts are renowned for their exceptional quality and craftsmanship. Despite this, our commitment to offering affordable prices leads us to make thoughtful choices regarding included accessories. Instead of including a costly high-quality hand pump and passing on the expense to you, we provide a good-quality generic hand pump with each boat as a complimentary gift.
While the hand pump we include is of good quality, there are rare instances where mishandling during shipping, such as dropping by FedEx, may cause minor issues. Specifically, the weight of the boat in the shipping box could occasionally lead to small cracks in the hose of the pump. However, a quick fix for such cracks is to apply duct tape around the affected area, restoring the pump to full functionality.
Should you encounter any such issue with your hand pump, whether due to shipping mishaps or performance concerns, we offer solutions to ensure your satisfaction. If the hose develops cracks, applying duct tape is the quickest remedy. Alternatively, if you prefer a new pump, you can send the damaged one back for a replacement. The return address can be found by clicking here.
In cases where the hose remains intact but the pump fails to provide adequate pressure for inflating the boat, you can troubleshoot by unscrewing the green cup with a T-handle and examining the rubber seal on the plunger. If this seal is torn or damaged, please notify us, and we will promptly send you a replacement seal.
Additionally, it’s important to note that we offer high-performance manual and high-pressure electric pumps through our Accessory section. These pumps are designed to meet specific inflation needs and can enhance your overall boating experience by providing efficient and reliable inflation capabilities.
Our goal is to ensure that your experience with Saturn inflatable boats and accessories is hassle-free and enjoyable. We strive to address any issues promptly and provide solutions that meet your needs, whether through quick fixes like duct tape or replacements for damaged components.
As part of our commitment to ensuring customer satisfaction, we recommend conducting a thorough inspection of the hand pump included with your Saturn inflatable boat or raft. Here are the steps you should take to ensure the pump’s optimal performance:
Check for Hose Holes: Before using the hand pump, carefully inspect the hose for any signs of damage, including small holes or cracks. Ensure that the hose is free from any leaks that could affect its ability to inflate your boat effectively.
Inspect Valve Adapter: Additionally, examine the valve adapter attached to the pump. Look for any visible damages such as cracks or deformities that may hinder its functionality. A damaged valve adapter can lead to air leakage during inflation, so it’s crucial to address any issues promptly.
Contact Us: If you discover any problems with the hand pump, such as hose holes or damaged valve adapters, please don’t hesitate to contact us via email. Our customer support team is ready to assist you and provide guidance on how to resolve the issue.
By conducting these checks before using the hand pump, you can ensure a smooth and hassle-free inflation process for your Saturn inflatable boat or raft. Your satisfaction is our priority, and we’re here to help address any concerns or issues you may encounter with the hand pump or any other accessories.
Our range of inflatables is versatile and suitable for various water activities such as fishing, diving, snorkeling, spearfishing, and more. However, it’s crucial to ensure safety measures are followed, especially when handling fish around the inflatables.
One important consideration is the sharpness of fish pectoral fins, which can pose a risk of puncturing the PVC or Hypalon fabric of the inflatable. Even small fish can have remarkably sharp fins that may create micro punctures, leading to slow leaks that might not be immediately noticeable.
To mitigate the risk of accidental punctures by fish fins, we recommend the following precautions:
Exercise Caution: Always handle fish with care around your inflatable. Be mindful of their sharp fins and avoid letting them come into direct contact with the air-filled chambers.
Use a Fish Basket or Cooler: When catching or transporting fish, use a basket or cooler to contain them. This prevents the fish from jumping around and potentially puncturing the boat accidentally.
Attach a Collapsible Fish Basket: Consider attaching a collapsible fish basket to the outside of the boat using a rope. This keeps the fish separate from the inflatable’s fabric, reducing the risk of damage.
Inspect for Micro Punctures: Periodically inspect your inflatable for any signs of micro punctures caused by fish fins. These may manifest as slow leaks that become noticeable over time. If detected, these small holes can be easily repaired by applying a drop of suitable glue.
For comprehensive details regarding the inclusions with each item, we encourage you to refer to the product page description specific to the inflatable boat or raft you are interested in. However, in general, here’s an overview of what you can expect with most of our boats:
Seat Bench: Most boats come equipped with at least one seat bench, providing comfortable seating for your water adventures.
Standard Inclusions:
- Hand Pump: Each boat includes a hand pump for convenient inflation.
- Repair Kit: A repair kit is included to address any minor damages that may occur during use.
- Carry Bag: A carry bag is provided for easy transport and storage of your inflatable.
- Aluminum Oars: Aluminum oars are included for efficient rowing or paddling.
- 4′ Rope: A 4-foot rope is included for securing your boat or for other purposes as needed.
- Floor Option: Depending on the model, your boat will come with either an air floor or an aluminum floor, each offering unique benefits and stability.
Optional Second Bench: When placing an order online, depending on the model, you may have the option to include a second bench for additional seating capacity. This can be specified during the ordering process.
Plywood Floors: Please note that we no longer offer plywood floors with our boats. Instead, we focus on providing durable and efficient air or aluminum floors.
Additionally, for a comprehensive range of optional accessories and spare parts, we invite you to visit our Accessories-Parts page. Here, you’ll find a variety of add-ons to enhance your boating experience and replacement parts to maintain your inflatable in optimal condition.
Click here for step-by-step instructions for deflating and folding your boat.
We highly recommend considering the installation of a hydrofoil on your outboard motor to enhance both speed and boat handling. A hydrofoil attachment offers several benefits that can significantly improve your boating experience.
Improved Speed: One of the primary advantages of installing a hydrofoil is the enhancement in speed. The hydrofoil helps lift the stern of the boat, reducing drag and allowing it to reach planing speeds more quickly. This results in a smoother and faster ride, especially during acceleration.
Enhanced Boat Handling: Alongside speed improvements, a hydrofoil contributes to better boat handling. It helps stabilize the boat by reducing bow rise, making steering more responsive and precise. This is particularly beneficial when maneuvering in rough waters or making sharp turns.
Quick Planing: The hydrofoil’s design facilitates quicker planing of the boat. It aids in getting the hull out of the water, which is essential for achieving optimal performance, especially with heavier loads or when towing water sports enthusiasts.
Maintained Planning Effect: Even at lower speeds, a hydrofoil helps maintain the planning effect. This means you can enjoy smoother cruising and better fuel efficiency during extended periods of boating at reduced speeds.
To illustrate the difference, take a look at the comparison image below. On the left side is a boat without a hydrofoil, and on the right side is the same boat with a hydrofoil installed. The visual representation clearly demonstrates how the hydrofoil improves the boat’s posture in the water, leading to enhanced performance.
You can easily find hydrofoils at reputable marine stores such as West Marine, Amazon, online retailers, or even in the boating section of stores like Walmart. Prices typically start at $25, making it an affordable and worthwhile investment for the improved boating experience it offers.

The air floor of our inflatable boats, made from PVC material, is engineered to be robust and resistant to punctures. However, it’s essential to be mindful of potential causes of damage, particularly when dealing with sharp objects or debris that could compromise the floor’s integrity.
While dog claws are generally not sharp enough to puncture the air floor, certain sharp objects like knives, fishing hooks, or small pieces of broken glass can pose a risk if enough pressure is applied. Additionally, objects picked up on the insoles of shoes, such as small shards of glass, can inadvertently cause cuts or punctures to the air floor during boarding.
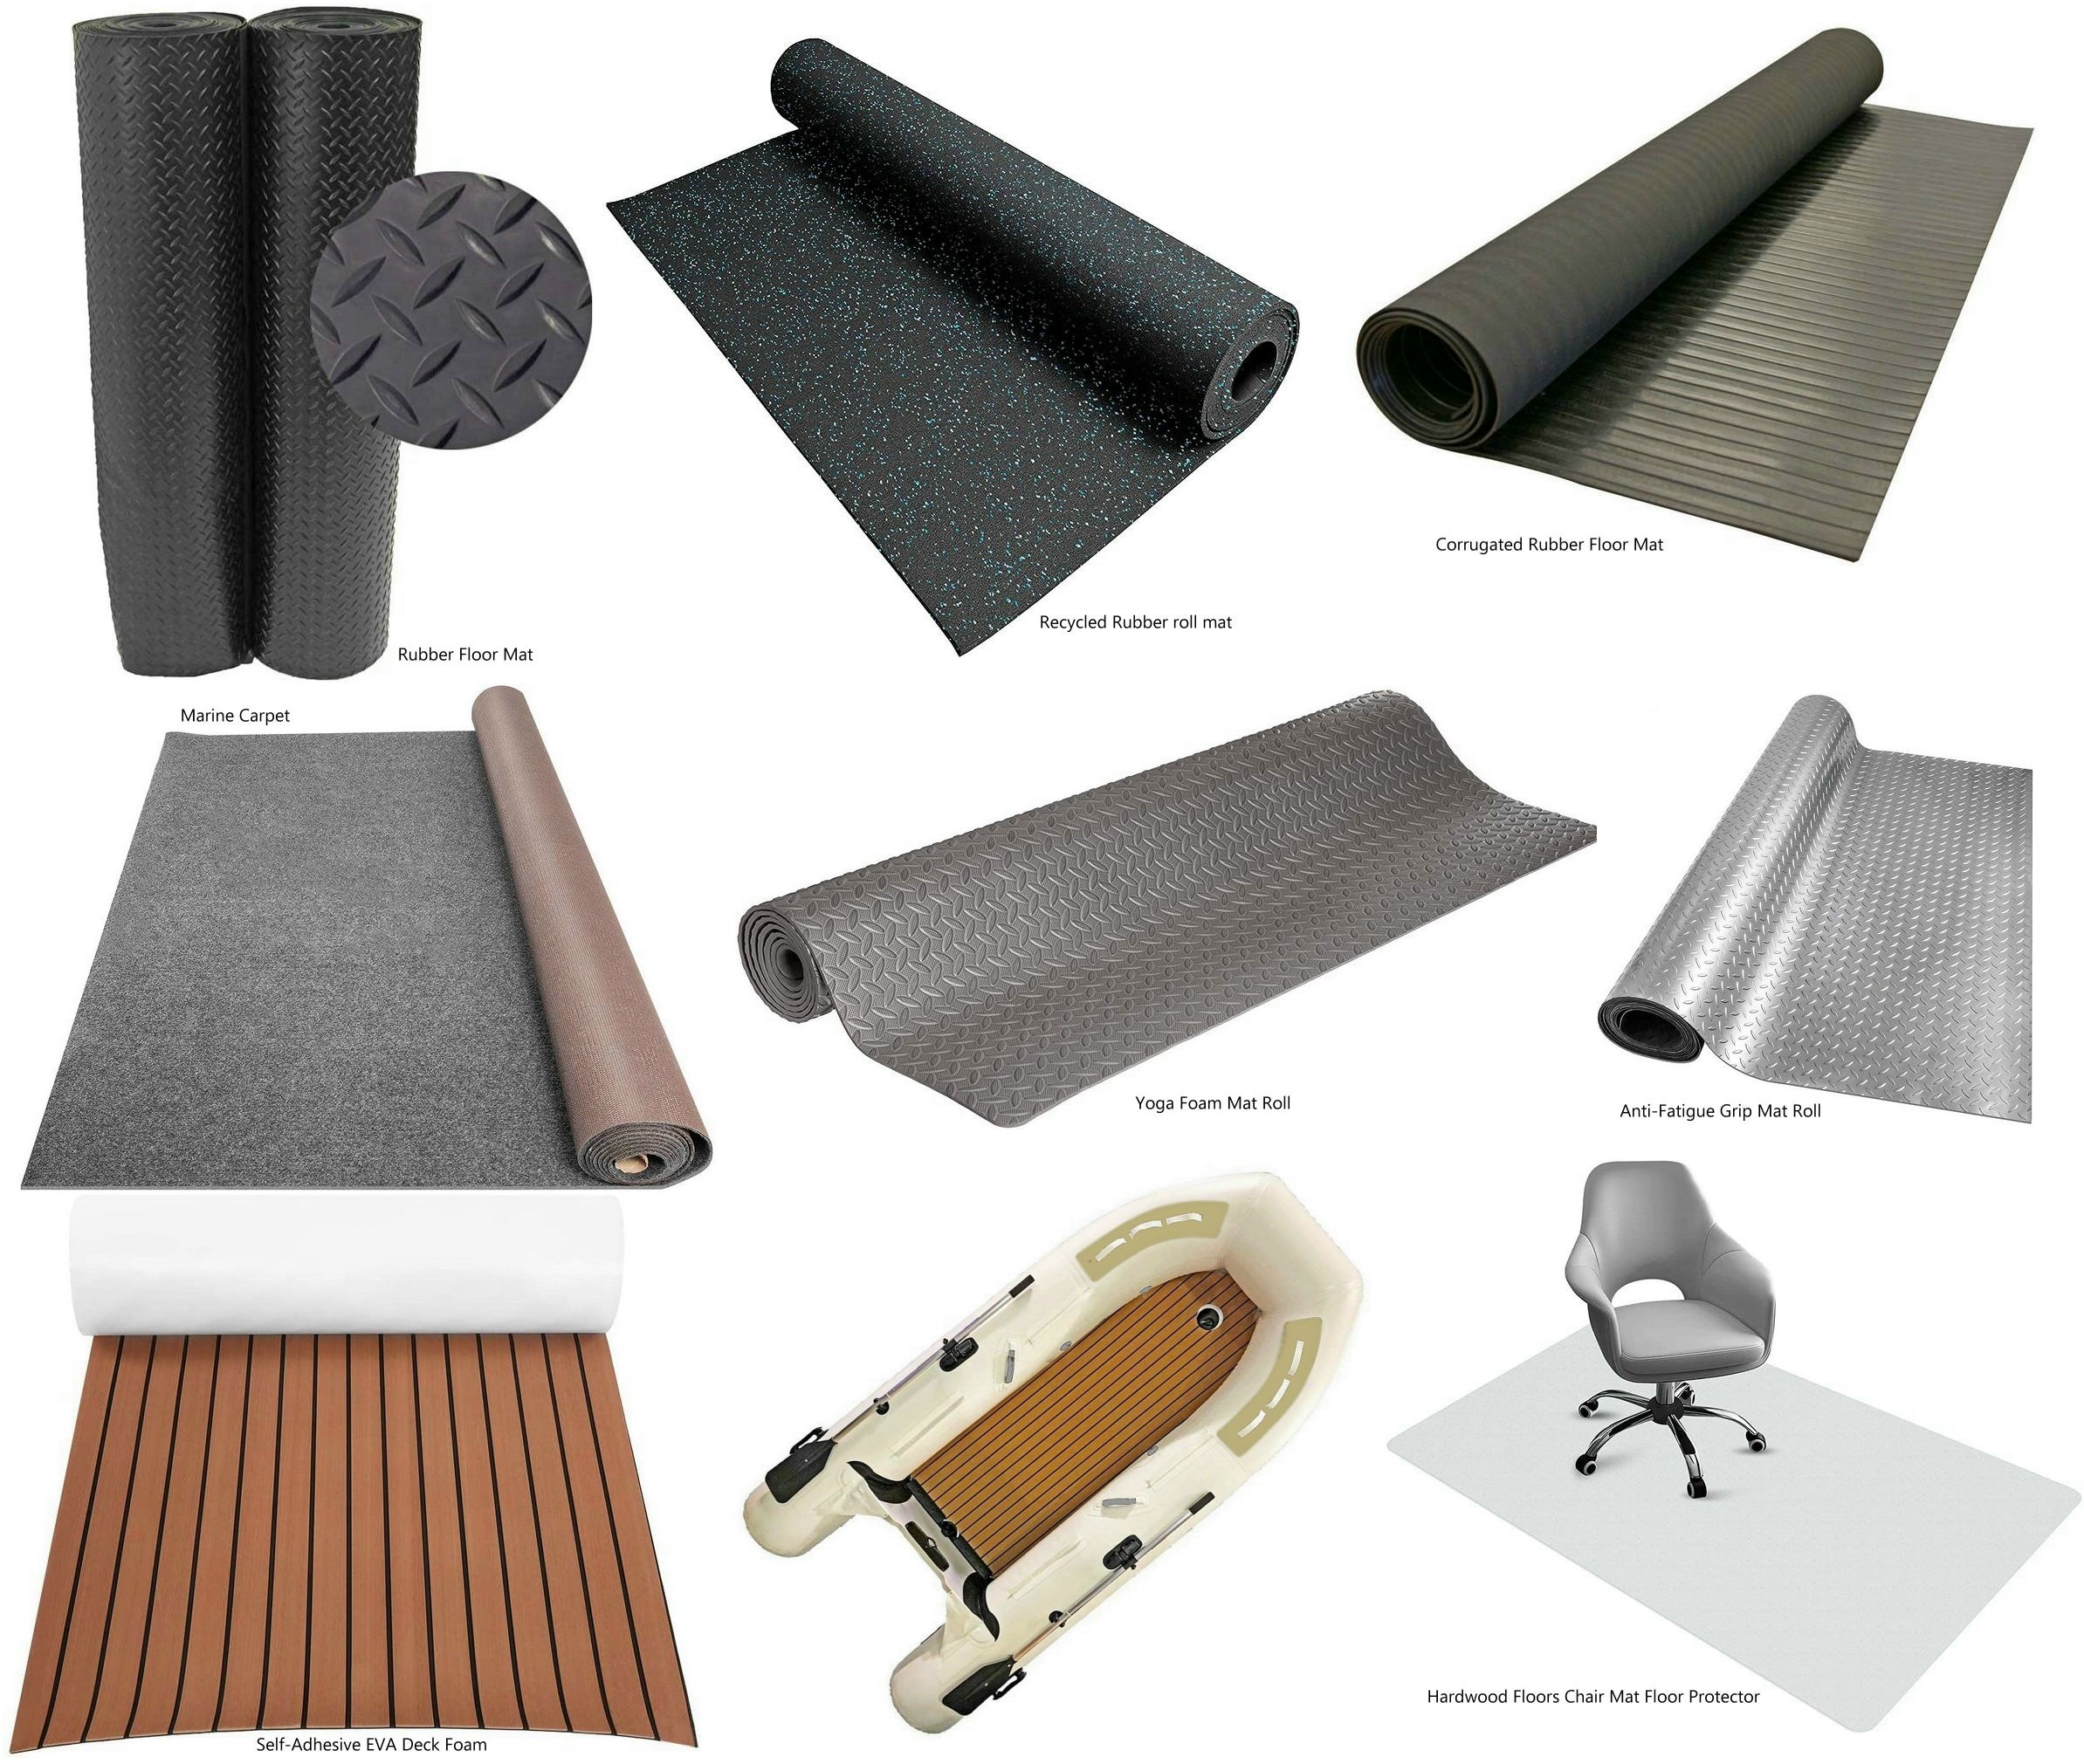
To safeguard the high-pressure air floor and maintain its pristine condition, we recommend using a protective layer of vinyl floor covering or carpeting. Here’s a detailed guide on how to apply this protective covering:
Purchase Suitable Material: Visit a hardware store to acquire a piece of vinyl floor covering or opt for regular carpeting. These materials provide a durable and protective layer for the air floor.
Create a Template: Start by creating paper patterns to accurately measure and cut the vinyl or carpeting to fit the inside of your boat and cover the floor completely. This step ensures a perfect fit and maximum coverage.
Cutting the New Flooring: Transfer the measurements from your paper patterns to the vinyl or carpeting and carefully cut out the new flooring material using sharp scissors or a utility knife.
Application: Lay the cut vinyl or carpeting over the air floor, ensuring it covers the entire surface area securely. The protective covering acts as a barrier against sharp objects, reducing the risk of punctures and maintaining the air floor’s durability.
There are various options available for floor protection, including:
- Anti-Fatigue Grip Mat Roll
- Marine Carpet
- Diamond Plate Rubber Flooring Rolls
- Corrugated Rubber Floor Mat
- Runner Mats
- Hardwood Floors Chair Mat Floor Protector
- Recycled Rubber Roll Mat
- Self-Adhesive EVA Deck Foam
- Yoga Foam Mat Roll
These options offer different levels of thickness, texture, and durability to suit your preferences and needs. Additionally, the flexible nature of floor vinyl covering or carpeting allows for easy storage by rolling it up when the boat is deflated.
By implementing these protective measures, you can effectively make your inflatable air floor virtually indestructible, ensuring many enjoyable outings on the water without concerns about potential damage.
Please see our Blog entry “How to protect air deck floor from accidental punctures.” for more information and pictures.
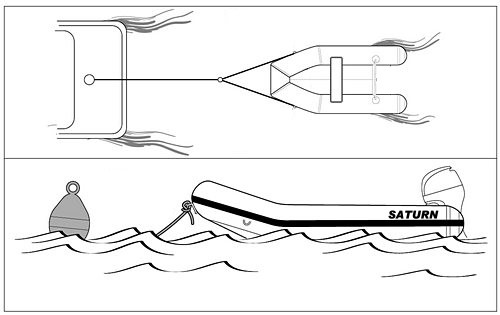
A towing bridle is an indispensable component for safely towing your inflatable boat, and you can easily find towing bridles at various marine retail stores or online. It’s crucial to understand the correct procedures for towing to avoid damage and ensure safety.
Towing Attachment Points: Avoid connecting the towing rope directly to the central D-ring with an integrated handle. Instead, utilize the designated towing D-rings located on both sides of the dinghy’s bow. This distributes the towing load evenly and reduces strain on the boat’s structure.
Boat Trailer Considerations: When using a boat trailer, take care not to pull a heavily loaded boat with an outboard motor over dry bunks. Doing so can risk damaging the front D-ring, which may rip off under excessive strain. Opt for using side towing D-rings or install rollers on the trailer to facilitate smoother and safer towing operations.
Proper Towing Bridle Setup: One common mistake in towing is improperly rigging the towing bridle. Avoid creating a loop at the center of the tow bridle and attaching the towing line there. Instead, ensure the towing line ends in a small bowline loop, through which the bridle passes. This setup allows the towline to move back and forth within the bridle, distributing tension evenly to both sides and reducing stress on the pad eyes of the dinghy.
Towing with Outboard Motors: While many sailors have small outboard motors for their inflatables, it’s generally recommended to remove the motor before towing. Leaving the motor attached can pose various hazards, including the risk of submerging the motor in large seas or it falling off the dinghy transom due to violent motion. Additionally, the added weight of the motor significantly increases the tow load, potentially leading to water ingress and strain on the bridle pad eyes.
Load Distribution and Water Ingress: Unequal load distribution, especially with added weight like an outboard motor, can lead to shipping water aboard the inflatable. This can strain the bridle pad eyes, causing potential failure, especially when load equalization isn’t maintained. Even a small amount of water inside the inflatable can drastically increase the load, emphasizing the importance of proper towing techniques and load management.
By adhering to these detailed guidelines, including using a towing bridle correctly, selecting appropriate attachment points, and considering the impact of outboard motors on towing safety, you can ensure a safer and more efficient towing experience for your inflatable boat while minimizing the risk of damage and ensuring overall boating safety.
When transporting inflatable boats on a trailer with the outboard motor raised, it’s important to be mindful of the potential strain that heavy outboard engines can exert on the boat’s transom. This is particularly evident when the trailer encounters bumps or uneven pavement during transit, which can lead to damage to the transom if the motor’s weight isn’t properly supported.
To mitigate this risk and provide additional support for the outboard motor’s weight during transportation, you can consider installing a pole support. These supports are designed to extend from the end of the trailer to the end of the outboard motor, effectively distributing and bearing the weight of the motor to prevent undue strain on the boat’s transom.
Here are some detailed points to consider regarding the installation of a pole support:
Purpose of Pole Support: The primary function of a pole support is to provide extra stability and reinforcement for heavy outboard motors while the boat is being transported on a trailer. By extending the support from the trailer to the motor, it helps distribute the weight more evenly and reduces the risk of damage to the transom caused by sudden movements or bumps.
Availability: Pole supports for outboard motors are readily available at stores that sell trailers for boats, as well as online outlets. They come in various designs and configurations to suit different trailer setups and motor sizes.
Installation Process: Installing a pole support typically involves securing one end of the support to the end of the trailer and the other end to the outboard motor. The support should be adjusted to provide adequate height and stability, ensuring that it effectively bears the weight of the motor throughout the journey.
Benefits of Pole Support: The use of a pole support offers several benefits, including:
- Minimized strain on the boat’s transom, reducing the risk of damage.
- Enhanced stability and balance during transportation, especially on rough roads or uneven terrain.
- Protection for the outboard motor from excessive movement or impact while on the trailer.
By investing in and properly installing a pole support for your outboard motor during transportation, you can significantly reduce the potential for transom damage and ensure a safer and more secure towing experience for your inflatable boat.
Saturn Inflatable boats are crafted using top-quality materials comparable to those used by renowned, higher-priced brand name inflatable boats available in retail marine stores. In fact, our commitment to exceptional workmanship ensures that the quality of our boats equals or even surpasses that of many overpriced brand names in the market.
Here are some key strengths and features of Saturn boats that set them apart:
Clean, Hand-Made Seams: Our boats boast impeccably crafted seams where the glue is seamlessly integrated, leaving no protrusions or imperfections.
Double Layer Fabric at the Bottom: All tubes are reinforced with double-layer fabric at the bottom, enhancing durability and resistance to wear and tear.
Thick 1100 Dtex Fabric: We use an extra-thick 1100 Dtex fabric with polyester support, significantly thicker than fabrics utilized by some other renowned brands. This robust fabric enhances the boat’s longevity and performance in various conditions.
Flat and Rigid Air Floor: Unlike many other brands, our air floors are flat and rigid throughout, without any bending in the front. This design ensures stability and comfort while onboard.
Safety Valve: Our boats are equipped with safety valves that prevent over-inflation, ensuring optimal air pressure for safe and efficient use.
Now, let’s delve into the factors contributing to our competitive pricing and why Saturn boats offer excellent value:
Direct Importing: We source our boats directly from the manufacturer, eliminating intermediaries and associated markups.
Online Business Model: Operating primarily online helps us avoid the overhead costs that retail stores typically pass on to customers, allowing us to offer more competitive prices.
Minimal Marketing Expenses: Unlike some major brands heavily invested in marketing, we focus on delivering quality products without excessive marketing expenditures, further reducing costs.
Streamlined Distribution: Our business model doesn’t rely on maintaining an extensive network of dealers and retail outlets, leading to cost savings that benefit our customers.
2-Year Warranty: Our warranty model is straightforward, offering a 2-year warranty without adding extra years that inflate retail prices unnecessarily.
The feedback from our satisfied customers, many of whom have prior experience with leading brands like Zodiac, Avon, and West Marine, speaks volumes. Numerous customers have expressed surprise at the exceptional quality of Saturn boats, often stating that they exceed their expectations. A significant portion of our sales comes from referrals by delighted Saturn boat owners, highlighting the trust and satisfaction our customers have in our products.
In summary, Saturn Inflatable boats combine superior quality, innovative features, and competitive pricing, making them a preferred choice for boaters seeking outstanding performance and value for their investment.
Saturn inflatable boats and KaBoats are ideally suited for short shaft 15″ outboard motors, which are recommended for optimal performance and compatibility with the boat’s design. It’s crucial to consider the weight of the outboard motor, as lighter motors tend to offer better handling and efficiency on the water. Both 2-stroke and 4-stroke engines can be installed on the boat’s transom, but 2-stroke engines are generally lighter than their 4-stroke counterparts, making them a preferred choice for some users.
While long shaft 20″ motors are not recommended due to potential extra underwater drag, they can still be installed if a short shaft motor is unavailable. In such cases, a long shaft outboard motor can be raised a few inches using a 2-3″ wooden bar placed on top of the boat’s transom. However, it’s important to note that this setup may affect the boat’s performance and handling to some extent.
The term “Max O/B motor” refers to the maximum recommended outboard motor power output specified in the technical specifications for Saturn inflatable boats. This indicates the horsepower rating at which the boat can plane effectively, especially when carrying the maximum recommended capacity of passengers and gear. For instance, a Saturn SD365 inflatable boat can accommodate up to a 30 HP outboard motor. However, a 9HP or 15 HP motor can provide excellent performance with a smaller number of passengers, typically 2-3 people onboard.
To achieve planing with a full load of 5 people and gear, a higher horsepower motor, such as a 30 HP outboard, may be necessary. This ensures sufficient power and thrust to lift the boat onto a plane, allowing for smoother and more efficient navigation, especially in conditions where maximum capacity is utilized.
In summary, selecting the right outboard motor for your Saturn inflatable boat involves considering factors such as shaft length, weight, and horsepower, as specified in the technical guidelines. This ensures optimal performance, handling, and safety while enjoying your boating experience.
The Manufacturer Identification Codes (MIC) were officially assigned to us by the US Coast Guard on May 6, 2003. This code serves as a unique identifier for our company in the marine industry, indicating our compliance with regulations and standards set by maritime authorities.
Furthermore, our boats have undergone rigorous testing and certification processes to meet international standards. They are certified by CE (Conformité Européenne), ISO (International Organization for Standardization), and Germanischer Lloyd in Europe, Asia, and Australia. These certifications attest to the quality, safety, and adherence to established norms in different regions, ensuring that our products meet the highest industry standards globally.
While the NMMA (National Marine Manufacturers Association) certification is available and recognized, it is considered optional and comes with associated costs. In our efforts to maintain competitive pricing and keep our expenses in check, we have chosen not to pursue NMMA certification. This decision allows us to offer our customers high-quality products without unnecessary additional expenses, ultimately contributing to keeping our prices affordable and accessible to a wider audience.
By prioritizing essential certifications such as CE, ISO, and Germanischer Lloyd, we demonstrate our commitment to meeting stringent quality and safety requirements while remaining mindful of cost considerations. This approach enables us to deliver reliable and certified inflatable boats to our customers while ensuring value and affordability in our offerings.
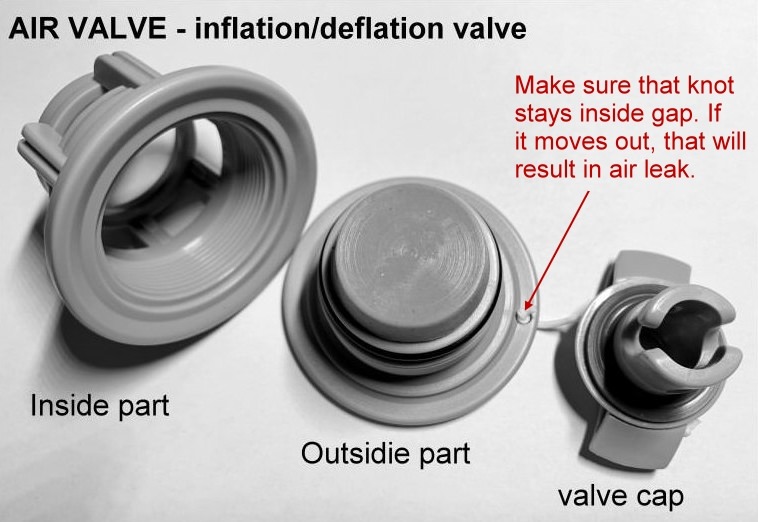
The inflation valve of our inflatable boats features a spring-loaded pushpin mechanism that serves a crucial role in managing air pressure within the air chambers. Understanding how to operate this valve correctly is essential for proper inflation and deflation of your boat.
Here’s a detailed guide on how to use the inflation valve effectively:
Pushpin Positions: The pushpin inside the inflation valve can be locked into two positions: up or down. When the pushpin is pressed down into the valve, it allows air to escape, facilitating deflation. Conversely, when the pushpin is in the upper position, it locks the air inside the chamber, preventing air from escaping through the valve.
Pre-Inflation Check: Before connecting the air pump valve adapter to the valve, ensure that the pushpin is in the upper, popped-up position. This ensures that the valve is sealed and ready for inflation.
Inflation Process: a. Insert the air pump valve adapter into the valve and rotate it clockwise to latch onto the crest inside the valve securely. b. Begin inflating the air chamber using the air pump until it reaches the desired air pressure. The chamber should feel hard to the touch, with no visible wrinkles on the surface.
Disconnecting the Pump Adapter: After inflating, rotate the air pump valve adapter counter-clockwise to disconnect it from the valve. This action will seal the valve automatically using the pushpin, preventing air from escaping.
Deflation Procedure: If you need to deflate the boat later on, press down on the pushpin inside the valve and turn it in any direction until it stays in the pressed-down position. This unlocks the valve, allowing air to escape freely from the tubes, facilitating deflation.
By following these steps and understanding how the inflation valve and pushpin mechanism operate, you can ensure efficient and effective inflation and deflation of your inflatable boat, maintaining optimal air pressure for safe and enjoyable boating experiences.
Here’s a step-by-step guide on how to replace a valve on your inflatable boat:
Visit the Valve Assembly Page: Start by visiting the dedicated valve assembly page on our website. This page contains comprehensive instructions and tools necessary for valve replacement.
Order Replacement Parts: If you need to replace a valve, you can order replacement valves and the required tools directly from our website. Simply follow the link provided to access the ordering page.
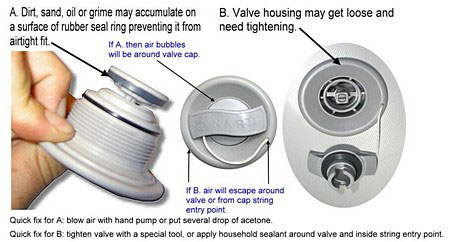
Unscrew the Top Part: To replace the valve, begin by unscrewing the top part of the existing valve assembly. This step allows you to access the interior components of the valve for cleaning or replacement.
Clean or Replace the Valve: If your valve is simply dirty or has a minor issue, cleaning the rubber seal inside the valve may resolve the problem. However, if the valve is damaged or defective, you can replace it with a new valve from our replacement parts selection.
Screw in the New Valve: Once you have cleaned the valve or replaced it with a new one, screw the new valve securely into place using the appropriate tools. Ensure that the valve is tightly sealed to prevent air leaks.
Under normal circumstances, with half of a maximum persons/load capacity, or about 50% of the maximum O/B power rating may be necessary to put the boat on plane. For example: the SD365 is rated for up to a 30 HP outboard motor. But a 15 HP with hydrofoil installed would be enough to put a 12′ boat on plane with 1-4 people and a light load.
The lighter the motor, the faster boat will run. 2-stroke engines, while still possible to find, are much lighter then 4-strokes, and will provide same power at less strain to the transom. Max O/B Motor means: the maximum power outboard motor that can be safely used to plane a boat loaded to the maximum capacity on normal water surface conditions. Please exercise common sense and caution when using maximum motor capacities. Do not jump from wave to wave as new 4-stroke motors are much heavier then 2-strokes and provide extra strain on the transom.
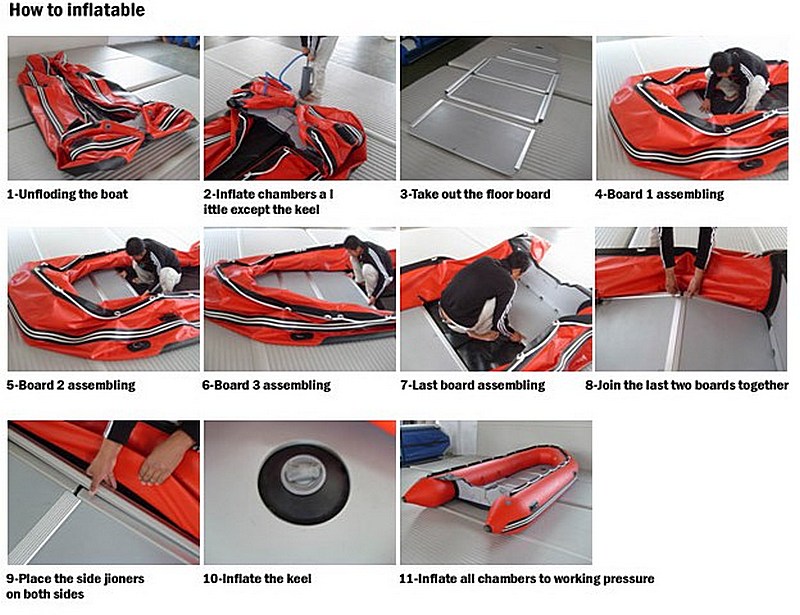
Prepare for Inflation: a. Ensure all valves are closed before starting the inflation process. b. Lay out the deflated boat on a flat surface, ensuring there are no sharp objects that could damage the material.
Inflate Tubes to 75% Full: a. Begin by inflating all tubes to approximately 75% full using a suitable air pump. b. Monitor the inflation to ensure even pressure distribution across all tubes.
Insert Boat Seats: a. Insert the boat seats into their designated spots on the boat, following the manufacturer’s instructions.
Place Deflated Air Floor: a. Position the deflated air floor inside the boat with the gray plywood board facing the keel. b. Ensure that the valve of the keel is accessible through the hole in the air floor for later inflation.
Secure Plywood Boards: a. Place both ends of the plywood boards under the left and right sides of the tubes to secure them in place. b. Ensure the air floor is properly aligned and stretched along the boat’s bottom, covering it from the nose to the transom.
Inflate the Air Floor: a. Begin inflating the air floor using the air pump until it becomes hard to the touch. b. You’ll notice the air pressure pushing the air pump handle up, indicating that the floor is fully inflated. c. Ensure the floor is evenly inflated without any wrinkles or sagging.
Fully Inflate Tubes: a. Proceed to inflate all tubes to 100% capacity until they are hard to the touch. b. Check for any areas that may require additional inflation to achieve uniform pressure across all tubes.
Inflate the Keel: a. Inflate the keel through the designated hole in the air floor using the appropriate valve and air pump attachment. b. Inflate the keel until it reaches the recommended air pressure, ensuring it provides proper stability and buoyancy.
Steps for assembly inflatable boat with plywood floor. Click image to zoom in:
You don’t need to have an air pressure gauge to properly inflate Saturn boats. Generally, you can gauge the inflation level by touch and feel. When the boat tubes and floor feel hard to the touch and it becomes challenging to pump more air in, it indicates that the boat is adequately inflated and ready for use. This tactile approach is sufficient for most manual inflation methods.
However, if you’re using a high-pressure electric air pump, it’s crucial to follow specific guidelines to prevent over-inflation, which can lead to damage:
Monitor Inflation by Touch: As you inflate the boat using a high-pressure electric pump, periodically check the firmness of the tubes and floor by touching them. Stop pumping when they feel sufficiently hard to the touch.
Avoid Excessive Pressure: High-pressure pumps can quickly over-inflate the boat if not monitored carefully. Avoid pumping air beyond the point where the tubes and floor feel hard and resistant to further inflation.
Use Pump’s Pressure Gauge: If your high-pressure electric pump is equipped with a pressure gauge, use it to monitor the air pressure levels. Refer to the manufacturer’s recommended air pressure specifications for your specific boat model.
Follow Manufacturer’s Recommendations: Always follow the inflation guidelines provided by Saturn for your specific boat model. These guidelines typically include recommended air pressure levels for optimal performance and safety.
Prevent Consequential Damage: Over-inflation can lead to damage such as burst seams or stress on the boat’s material. By inflating the boat to the appropriate firmness, you can avoid such issues and prolong the lifespan of your inflatable boat.
- Pressure Units Conversion:
- 1 psi (pounds per square inch) = 0.06895 bar (bars)
- 1 bar = 14.50326 psi
- 1 kPa (kilopascal) = 0.145 psi
These conversion factors allow you to convert between commonly used pressure units such as psi, bar, and kPa, which may be encountered when dealing with inflatable boat air pressure.
Additionally, some boats may come equipped with a Safety Release Valve (SRV). Understanding how the SRV functions and its requirements is important for proper boat maintenance and safety:
SRV Functionality:
- The SRV is designed to release excess air from the boat’s chambers in specific situations.
- It operates effectively when all chambers are inflated to approximately the same level of pressure.
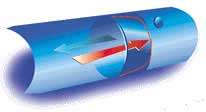
- Air pressure can propagate between chambers through internal separators with conical shapes. These separators are not flat like drums but are cone-shaped and installed between chambers.
Proper Inflation for SRV Operation:
- To ensure the SRV functions correctly, it’s essential to inflate all chambers to a similar level of pressure initially.
- If one chamber is not fully connected to the SRV due to uneven inflation, the SRV may not work as intended.
- It’s important to note that the SRV is not designed to prevent over-inflation but rather to release excess air. Over-inflation can still occur if chambers are inflated beyond recommended levels.
SRV Purpose:
- The SRV serves as a safety feature to release excess air if chambers become overheated, especially when exposed to direct sunlight, or when the boat is taken to higher altitudes after inflation.
- It helps maintain safe air pressure levels within the boat’s chambers, preventing potential damage due to excessive pressure.
.
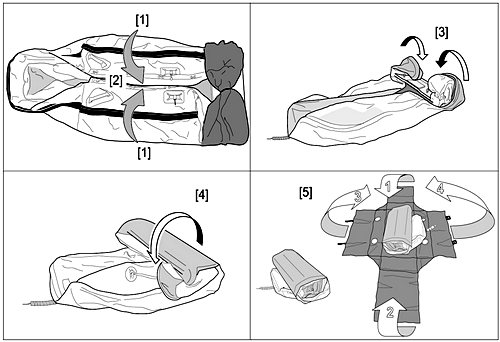
We are pleased to offer you complimentary instructions for creating a Deluxe Soft Cushion that can be placed over your boat’s plywood or aluminum bench. This DIY project is designed to enhance your comfort and enjoyment while out on the water. The instructions are provided free of charge as a gift to our valued customers.
Please visit the web page dedicated to these instructions to access all the details and steps required to complete this project. The instructions are provided as-is, and we regret that we cannot offer additional information beyond what is already provided on the webpage.
We hope you find this DIY project helpful and that it adds an extra layer of comfort to your boating experience. If you have any questions specifically related to the instructions or materials needed, please refer to the information provided on the webpage.
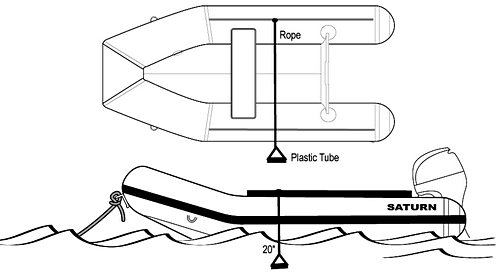
To create a boarding ladder for your boat, gather 8-9 inch long pieces of 2″ diameter white plumbing PVC pipe and a piece of thick rope. Begin by drilling holes at the ends of each PVC pipe. These holes will be used to thread the rope through.
Once you have drilled the holes, run the rope through one hole in a pipe and out through the corresponding hole on the other side. Make sure the rope is securely attached and does not slide freely through the pipes.
Next, make two knots on the rope where it exits each hole in the PVC pipe. These knots will act as stoppers to prevent the pipes from sliding along the rope when you’re boarding the boat.
To make the boarding ladder functional, tie additional knots along the rope at intervals. These knots will serve as handholds to assist with pulling yourself out of the water and onto the boat.
Attach one end of the rope to a sturdy grab line or any other point on the boat that can support heavy weight. Ensure that the other end of the rope extends into the water and hangs approximately 20 inches below the water line.
When boarding the boat from the water, place one foot inside the loop formed by the pipe and grab onto the rope with both hands. Use the knots on the rope as grips to pull your body upward and inside the boat. The ladder design allows for a secure and manageable way to board your boat from the water, enhancing safety and convenience during water activities.
|
|
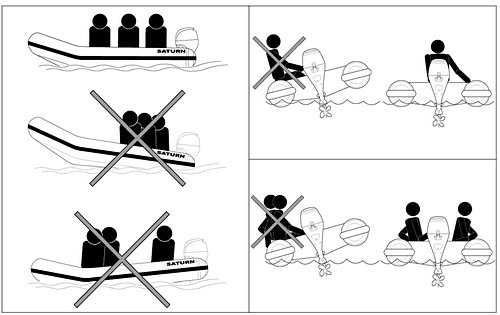
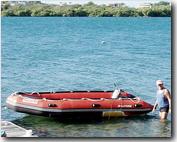
Please see below for proper loading of the inflatable boat:
In the event that the Bill of Sale is not included in the shipping pouch or if you require replacement documents, you have the option to download the required paperwork from our website. Simply navigate to the Downloads section and click on the link provided. This will grant you access to the necessary forms and documents that you may need for registration, ownership, or other purposes related to your purchase.
Downloading the paperwork ensures that you have the required documentation readily available and can proceed with any necessary procedures without delay. If you encounter any issues or have questions regarding the download process or the documents themselves, feel free to reach out to our customer support for assistance.
To ensure the correct positioning of the keel on your boat, follow these step-by-step instructions:
Start by deflating the boat tubes completely. This step is crucial to create the necessary space and flexibility for adjusting the keel.
Next, deflate and carefully remove the air floor from the boat. Take your time to ensure that the air floor is fully deflated and detached from its position.
Now, focus on the keel. Begin by inflating the keel to its full capacity. This initial inflation helps to identify any issues with positioning or alignment.
After inflating the keel, deflate it slightly while ensuring that you spread it out evenly on both sides. This step is important for achieving a balanced and centered placement of the keel within the boat’s structure.
Once you have adjusted the keel’s position, reinsert the air floor back into the boat. Ensure that the air floor is placed correctly and securely within its designated area.
With the air floor back in place, proceed to inflate the boat tubes to 100% capacity. Properly inflated tubes contribute to the overall stability and performance of the boat.
Finally, inflate the air floor to its recommended pressure level. After completing this step, your boat should be properly set up with the keel correctly positioned for optimal functionality and performance on the water.
Cavitation issues in boats can stem from various factors, and it’s crucial to address them for optimal performance. Here are the detailed reasons and solutions:
Propeller Issues: The first major cause of cavitation is an incorrect or damaged propeller. A propeller that is not suited to the boat’s specifications or is damaged can lead to cavitation problems. It’s essential to ensure that the propeller is in good condition and matches the requirements of your boat.
Inflation Problems: The second common cause, and often the most likely, is improper or incomplete inflation of the boat’s chambers. When the chambers are not fully inflated, it creates water disturbance under the boat tubes, resulting in cavitation. To address this, use a hand air pump to inflate all boat chambers until they are firm to the touch. Avoid relying solely on electric pumps or compressors, as they may not fully inflate the chambers.
Debris and Seaweed: Another overlooked reason for cavitation is the presence of seaweed, debris, or foreign objects stuck to the outboard motor’s skegs or propeller. Even small amounts of seaweed or debris can cause cavitation issues. To resolve this, put the motor in neutral and carefully clean any debris around the propeller. Ensure that the propeller is not rotating while cleaning.
Customer’s video about prop difference
More Info about Cavitation due to the outboard propeller:
Ventilation occurs when the propeller blades draw surface air or exhaust gases into the water stream, leading to a reduction in the propeller’s load and potential over-revving.
Anti-Ventilation Plate: This is a sizable plate integrated into the gear case housing directly above the propeller. Its purpose is to minimize the intake of surface air into the propeller blades, helping maintain optimal performance.
Cavitation, on the other hand, results from the creation of a low-pressure area in the water, often caused by a propeller blade’s movement. This occurs when the blade encounters resistance or has an irregular surface, leading to a low-pressure zone where cavitation bubbles can form. These bubbles collapse upon reaching areas of higher pressure, causing rapid pressure changes and potential erosion on the blade’s surface.
A customer shared their experience with resolving cavitation by changing the propeller pitch to an appropriate level for high-altitude lakes, which significantly improved their boat’s performance.
Another customer initially experienced cavitation issues despite what they believed was proper inflation. However, after hand-pumping the chambers until they were fully resistant, the cavitation problem was resolved, leading to improved handling and performance of the boat.
These examples illustrate the importance of understanding and addressing factors such as propeller pitch, anti-ventilation measures, and proper inflation to mitigate cavitation issues and ensure optimal boat performance.
A highly effective solution to prevent slipping on boat seats is to use non-slip stair tread tape manufactured by a reputable brand like 3M. This specific tape is designed to be durable and resistant to water, making it ideal for marine environments. You can easily find this tape in most hardware stores, ensuring accessibility for boat owners.
While primarily intended for stairs, this tape is versatile and can be applied to boat seats as well. Its non-slip properties significantly reduce the risk of slipping, especially during turns or when the boat is in motion. By enhancing the grip on the seats, it provides added safety and stability for passengers, preventing accidents and improving overall comfort during boating activities.
The drain valve in an inflatable boat is a common area where water may enter, but fortunately, addressing and fixing these issues is usually straightforward. Here are some potential reasons for water ingress through the drain valve and how to resolve them:
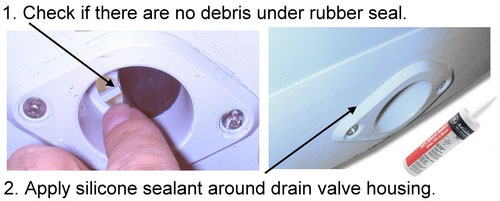
Incomplete Drain Plug Insertion: Ensure that the drain plug is fully inserted into its designated position. Check for any debris or obstructions on the plug and press it firmly to ensure it is securely in place.
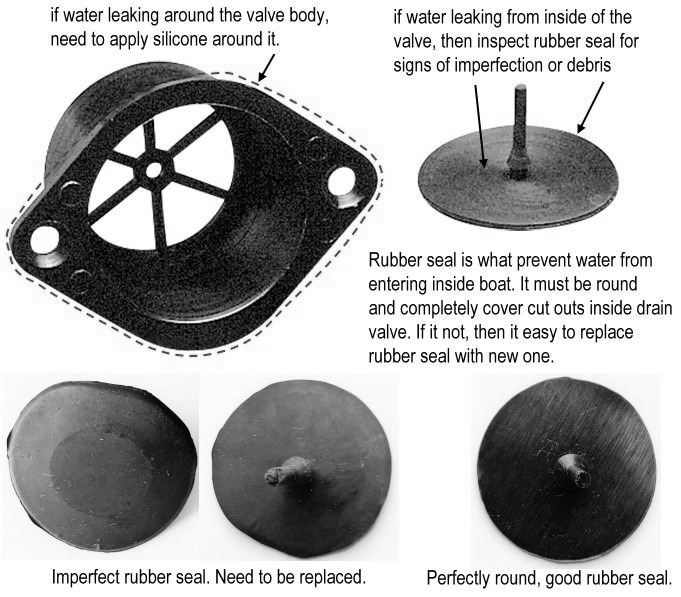
Dirty or Debris-Blocked Rubber Seal: The one-way rubber seal that locks the valve may become dirty or have debris stuck underneath it. Gently pull the rubber seal with your finger and inspect for any debris accumulated between the seal and the plastic housing. Clean the rubber seal with acetone to remove any dirt or debris.
Imperfect or Defective Rubber Seal: If the black one-way rubber seal that locks the valve is imperfect or not fully closing the opening, it may allow water to enter. Inspect the rubber seal for any defects or irregularities. If necessary, replace the rubber seal with a new one. Replacement drain valves can be purchased from various online platforms such as Amazon or eBay by searching for “inflatable boat drain.”
Loose Drain Plug Assembly: Check if the drain plug assembly has become loose or if there is insufficient sealant under the drain valve’s outer body. Tighten the screws on the drain plug assembly carefully to avoid damaging the plastic parts. Apply a clear silicone sealant designed for doors and windows around the drain valve assembly to create a watertight seal. Replacement drain plug assemblies can also be obtained upon request.
Once the boat is in the water, it’s normal to have some water inside due to factors like rain or splashes from the outboard motor. To remove excess water from the boat, there are various affordable options available on platforms like Amazon or eBay, including manual bilge pumps, battery-operated bilge pumps, and absorbent fabrics. You can find manual bilge pumps by searching for “hand bilge pump” on Amazon.
You can improve the support and stability of the plywood seat in your boat by using a regular cooler placed strategically between the seat and the air or plywood floor. The cooler should be selected to fit snugly under the seat to ensure proper support. Look for IGLOO or Coleman coolers at department stores as they often have models that are the ideal size for this purpose. These coolers not only provide extra support but can also serve as convenient dry storage containers for your belongings.
By placing the cooler between the seat and the floor, especially in boats navigating turbulent waters or jumping waves, you can prevent excessive pressure on the strips that secure the plywood seat to the tubes. For example, a Coleman 9 Qt. Excursion cooler in Red, with dimensions of 11.25″ x 12.66″ x 9.75″ and Vendor Part Number: 6209A703G, typically costs around $15 and can be an effective solution for this purpose.
Mark shared that his boat, a 14-foot Saturn, suffered a significant 4-foot gash on the port chamber due to running over a sharp rock. Initially, the damage seemed daunting, and local boat enthusiasts doubted it could be repaired. However, Mark’s resourcefulness and determination led him to successfully restore his boat to a fully functional state.
Despite the extensive tear that extended an additional 2 feet toward the stern beyond what was visible in the provided photo, Mark took proactive steps to fix it. He enlisted the help of a local expert who meticulously stitched the damaged area from both the inside and outside, initially using 5200 Sealant to seal the larger gaps. While this initial attempt reduced leakage to small pinholes, it didn’t completely solve the problem.
Mark then turned to Inland Marine and found a specialized liquid
adhesive designed for such repairs. He applied this adhesive from the inside of the chamber and carefully spread it by rocking the boat, ensuring even coverage. After two coatings applied on separate days, he reinforced the edges
of the patch with fresh 5200 Sealant, resulting in a perfect seal without any leaks.
Impressively, Mark has been using the boat for five days without any signs of leakage or the patch peeling back, showcasing the effectiveness of his repair efforts. He expresses gratitude for the extra PVC fabric and support he received, acknowledging that the Saturn boat model has proven its resilience and dedication to pleasing its owner.
Mark’s positive experience has garnered attention and praise for the Saturn brand on Culebra, highlighting the success of his repair project and the durability of the boat. He looks for
ward to personally visiting and thanking those who supported him in Florida, demonstrating his appreciation for their assistance in restoring his beloved watercraft.
A standard jet ski trailer is highly versatile and can be an excellent choice for transporting almost any type of inflatable boat. If you’re looking for a cost-effective option, you can explore used jet ski trailers on platforms like Craigslist.com or check local classifieds. Additionally, stores like Harbor Freight Tools or Northern Tool offer affordable foldable utility trailers that can be easily modified for use with inflatable boats.
To find a suitable trailer, you can start by searching for the keyword “trailer” and then sorting the results by price to find budget-friendly options. Alternatively, you can visit a local store that sells trailers to make a purchase in person.
For further guidance and inspiration, you can watch an excellent video submitted by one of the customers showcasing their trailer setup. Additionally, there’s a blog post available that details a custom trailer project undertaken by another customer, providing insights into how to tailor a trailer specifically for inflatable boat transportation.
Furthermore, a customer has shared a nice article discussing their trailer setup experience, along with various tips and tricks they learned along the way. This article can be a valuable resource for anyone looking to optimize their trailer setup for inflatable boat use.
Overall, leveraging a jet ski trailer or a modified utility trailer can be a practical and cost-efficient solution for transporting inflatable boats, offering flexibility and ease of use for boating enthusiasts.

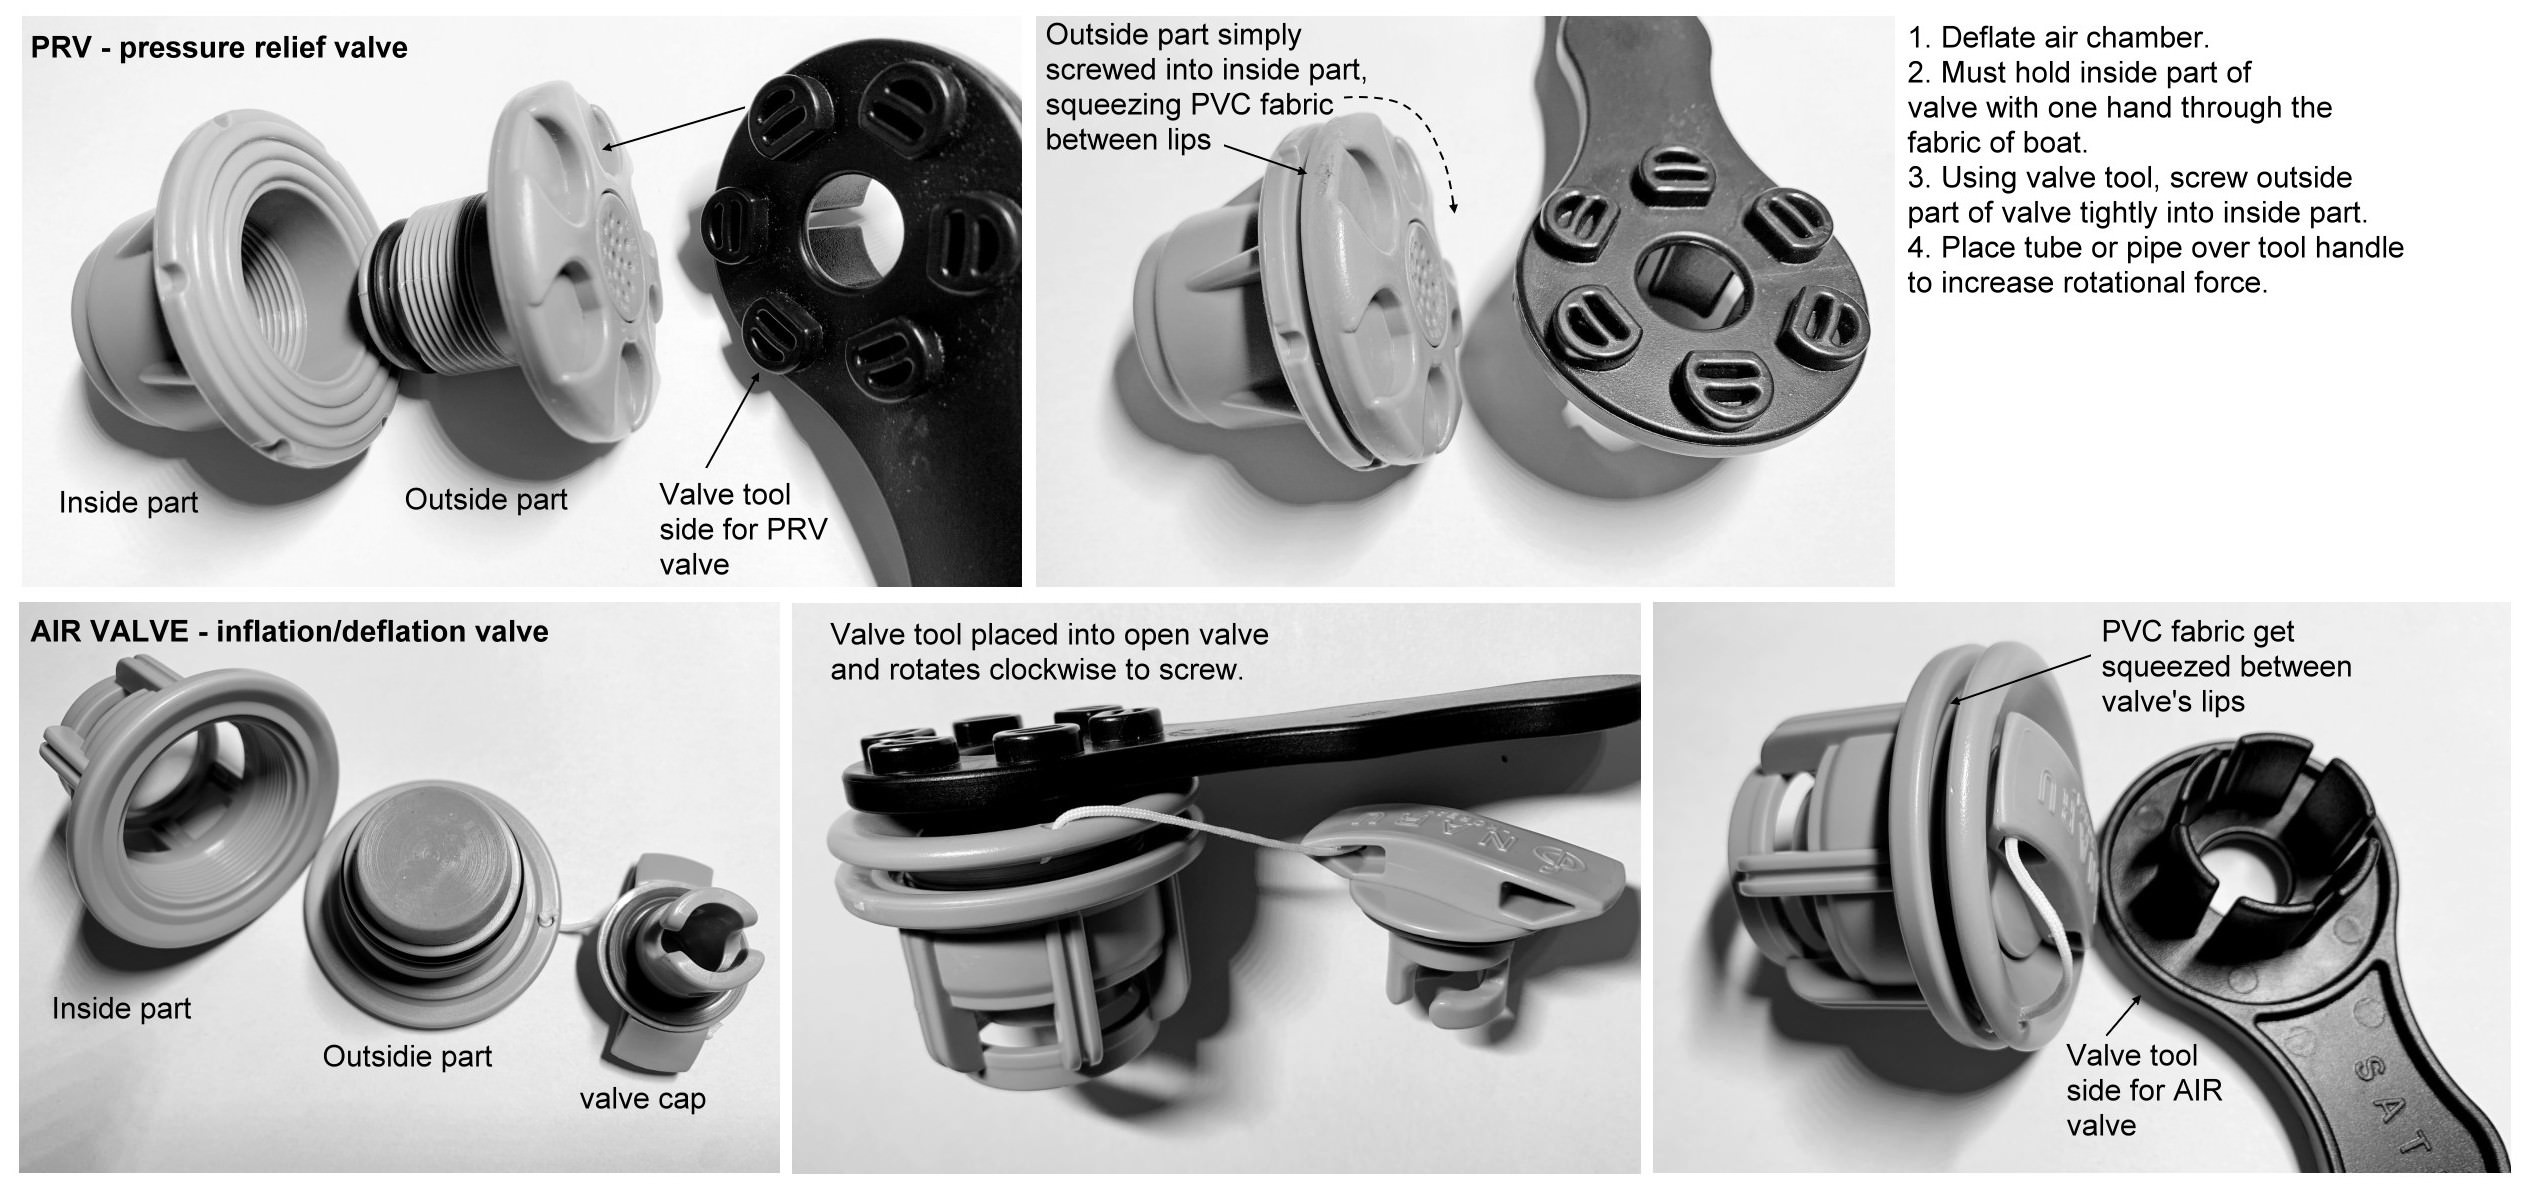
One of our customers shared a do-it-yourself (DIY) method for creating a specialized tool to work with NARU valves commonly found in inflatable boats. They used inexpensive “1” size PVC plumbing tube, which can be easily obtained from any home center or hardware store. The specific PVC tube used was actually a leftover piece from a previous project, highlighting its affordability and accessibility.
The DIY process involves simple filing or hand cutting to create six small grooves at the end of the PVC tube. These grooves are essential for fitting the tool onto the circular opening of the NARU valve after some sanding is done to ensure a snug fit. Once the grooves are properly filed and the sanding is completed, the tool can be slid over the six structural parts of the NARU valve, allowing for safe and easy removal of the internal valve component by turning it in a counter-clockwise direction.
Reassembling the valve is a straightforward process and follows the reverse steps of disassembly. The customer likens this DIY tool to a specialized socket tool used in mechanical work, emphasizing its functionality and utility in working with NARU valves commonly found in inflatable boats.
The choice of using plastic material for the DIY tool is deliberate, as it is more compatible with the plastic components of the NARU valve. This choice minimizes the risk of potential breakage or damage to the valve components during use, ensuring a safe and effective tool for maintaining and servicing inflatable boat valves.
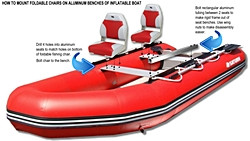
To enhance stability and prevent the rolling back of two seat benches when resting against the back support of a chair, consider installing rectangular aluminum tubing between them. This tubing will serve as a rigid frame, adding structural support and preventing unwanted movement. Using wingnuts for assembly and disassembly will make the process quicker and more convenient.
Start by measuring the distance between the two seat benches where you plan to install the aluminum tubing. Choose aluminum tubing of appropriate dimensions that will fit securely between the benches. Rectangular tubing is ideal for providing stability while keeping the structure lightweight.
To begin the installation, use a drill to create holes on both ends of the aluminum tubing. These holes should align with corresponding points on the seat benches where you intend to attach the tubing. Ensure the holes are accurately placed for a snug and secure fit.
Next, insert bolts through the drilled holes on the aluminum tubing and attach them to the benches using wingnuts. Tighten the wingnuts securely to ensure the tubing is firmly fixed in place. This assembly method allows for easy disassembly if needed, making adjustments or transportation more manageable.
Once the aluminum tubing is securely in place, consider further customization by drilling holes in the seat benches to match the holes on the bottom of foldable chairs. This step is crucial for attaching the chairs to the benches securely.
You have two options for attaching the chairs to the benches:
- Direct Bolt-On: Use bolts and nuts to directly attach the chairs to the benches through the pre-drilled holes. Ensure the bolts are tightened securely to create a stable connection.
- Swivel Platform with Quick Release Mount: Alternatively, install a swivel platform between the benches with a quick-release mount. This setup allows the chairs to rotate and provides a quick disconnect feature for easy removal or repositioning of the chairs.
One of the simplest and most effective methods for attaching registration numbers to the side of an inflatable dinghy is to create a display board using a rectangular plastic board, such as one that can be cut from a FOR SALE sign or similar material. This approach offers a practical and removable solution that complies with USCG regulations, which mandate that vessel registration numbers must be visible at all times but do not require permanent attachment.
To begin, obtain a rectangular plastic board that is large enough to accommodate the registration sticker and numbers. A piece cut from a FOR SALE sign is often suitable for this purpose. Ensure the board is sturdy and weather-resistant to withstand exposure to the elements.
Next, affix the registration sticker and numbers to the plastic board. Follow the instructions provided with the registration materials to ensure proper placement and adherence. The numbers should be prominently displayed and clearly visible.
After attaching the registration information, drill or cut holes in the corners of the plastic board. These holes will be used to secure the board to the inflatable boat.
Position the board over the side of the inflatable boat, as near to the bow as possible for optimal visibility. Use plastic cable ties to attach the board securely to the safety grab rope or another sturdy part of the boat’s structure. Ensure that the board is firmly attached and will not come loose during use.
This method allows for easy removal and reinstallation of the registration display as needed. It provides a practical solution for ensuring compliance with regulations while also maintaining the flexibility to remove the display when necessary, such as during transport or storage.
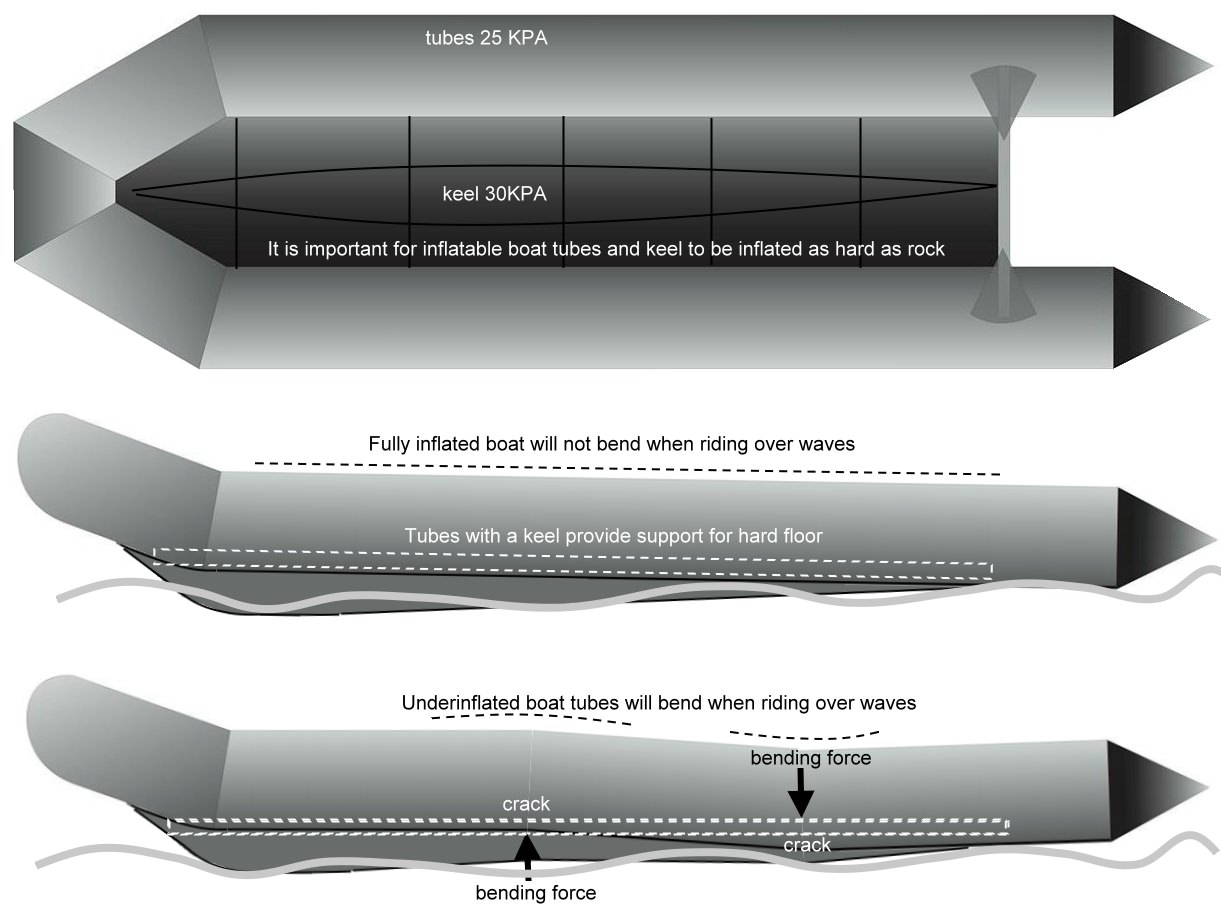
Ensuring the proper inflation of boat tubes and the keel is crucial for the overall structural integrity and performance of an inflatable boat. The recommended air pressure for the tubes is 25kpa, while the keel should be inflated to 30kpa. These pressures are designed to create a rigid and supportive structure that works in tandem with the hard floor inside the boat’s hull.
The tubes and keel of an inflatable boat are engineered to provide lateral support for the hard floor, distributing weight evenly and enhancing stability. When properly inflated, they should feel as hard as rock to the touch. Any sagging, wrinkling, or softness in the tubes or keel indicates insufficient inflation and can lead to performance issues.
Insufficiently inflated tubes or a soft keel can result in excessive weight being placed on the floorboards, especially during maneuvers like navigating waves or accelerating. This places undue stress on the floorboards, which are not designed to bear the full weight of the boat and its passengers alone. Instead, they are intended to work in conjunction with the boat’s hull and keel.
A fully inflated keel helps keep the floorboards flat, minimizing stress on side rails and floorboard stringers. The tubes also exert pressure on the floorboards through the side stringers, ensuring they remain in a straight line. If the keel is underinflated or soft, it fails to provide adequate support for the floorboards, leading to increased stress on the side rails and potential damage or cracking of the floorboards.
It’s important to note that improper inflation of the boat can void warranties, particularly if it results in damage to the floorboards. Additionally, underinflated tubes can cause the stringers to shift from their intended position over the side rails, further compromising the support for the floorboards and risking damage to the boat’s structure. Therefore, maintaining proper inflation levels is essential for the safety, performance, and longevity of an inflatable boat.
During the assembly process at the factory, the bottom of each inflatable boat is stitched to a strip of PVC material. This strip is then securely glued to the inner sides of the boat’s tubes. This stitching and gluing process is standard practice and is employed in the manufacturing of all inflatable boats, kayaks, and rafts.
After the stitching is completed, it is intentionally cut, leaving the bottom of the boat inside the structure, sandwiched between the tubes. This is a deliberate and essential step in the construction process and is not indicative of any defect or issue with the product.
The purpose of cutting the stitching is to allow for the installation of the air floor or other types of flooring inside the boat. The presence of the bottom material inside the boat, covered by the air floor, serves several important functions:
Structural Support: The bottom material adds structural support to the boat, enhancing its overall rigidity and durability.
Protection: It provides a protective layer between the floor and the water, minimizing wear and tear on the boat’s interior.
Aesthetic Finish: The presence of the bottom material gives the interior of the boat a finished and polished appearance.
Insulation: In some cases, the bottom material may also contribute to insulation, helping to maintain a comfortable temperature inside the boat.
Please see below video from one of our customers for some tips and ides:
We offer the option for customers to place pre-orders for products that are currently en route on incoming containers. When we have an approximate Estimated Time of Arrival (ETA) for a container, we make these pre-orders available. The ETA refers to the expected arrival time of the container at a US port, typically either Tacoma or Miami.
Once the container arrives at the port, it undergoes unloading from the ship, which takes a few days, followed by delivery to our warehouse. Unloading the container into our warehouse, box by box, and updating the inventory into our computer system also takes additional time, typically 1-3 days. Only after these processes are completed can we proceed with shipping orders.
It’s important to note that the ETA provided by the shipping company is an estimate and may be subject to delays due to factors such as port congestion or unloading delays.
We want to emphasize that we have limited control over shipments until the container is delivered, unloaded, and processed into our system. However, once the items become available, we make every effort to ship all pre-orders as soon as possible, often on the same day or the next day. This is in our best interest to clear up warehouse space and fulfill orders promptly.
When a customer places a pre-order, it means we reserve the product for them, and it is guaranteed once the container is received. The credit card associated with the pre-order will be charged a day or two before we are ready to ship the products. Please note that we do not reconfirm orders before processing payments.
Customers have the option to cancel or delete their orders before the container is received. If additional items were ordered along with the main item on pre-order, we will ship the additional items separately once we receive the main pre-ordered item.
BoatsToGo, Inc., operating through its website BoatsToGo.com, is a prominent manufacturer and trademark holder of SATURN Boats, Rafts, Kayaks, and Paddle Boards. As the manufacturer, they oversee the production of all SATURN-branded watercraft.
Canyon Rafts, a trusted dealer listed on BoatsToGo.com’s official dealers page, operates websites under the names SaturnBoats.com and SaturnRafts.com. They are an authorized dealer based in Idaho and have a specific arrangement with BoatsToGo, Inc.
One of the unique offerings that Canyon Rafts orders from BoatsToGo, Inc. is the exclusive SATURN TRITON variation. This particular variation of SATURN watercraft boasts C7 brand valves and heat-welded seams. This exclusive variation allows Canyon Rafts to differentiate themselves in the market and implement a distinct pricing structure. Consequently, BoatsToGo.com does not directly sell SATURN TRITON inflatables.
While many SATURN boats available through BoatsToGo.com also feature heat-welded seams, they do not utilize C7 brand valves. This deliberate decision enables Canyon Rafts to showcase their unique offerings within the SATURN brand.
What sets C7 valves apart from the standard SATURN valves used by BoatsToGo.com? Both valve types share a similar pushpin design, akin to the UK-manufactured C7 valves. However, the distinction lies in the shape of the valve cap and the method of attaching the hose to the valve. Despite these differences, it’s important to note that both the SATURN boats sold by BoatsToGo.com and the SATURN TRITON variation sold by SaturnRafts.com/SaturnBoats.com are manufactured in the same factories, using identical materials.
If your inflatable boat accumulates water due to heavy rains or other factors, there are effective methods to drain it efficiently. One such method involves utilizing the one-way drain valve present on most inflatable boats.
To begin, open the drain valve cap to allow the water to escape. Allow the boat to sit for approximately 30 minutes, during which time most of the water will naturally drain out due to the buoyancy of the air-filled tubes.
If there is still residual water in the boat after this initial draining period, there’s a technique to further remove it. Open the drain valve cap again and hang it over the transom of the boat. This positioning helps prevent additional water loss while implementing the next step.
With the drain valve cap open and the boat at a high speed, the G-forces generated will push out most of the remaining water through the one-way drain valve. This action effectively expels the water from the boat’s interior.
After the high-speed maneuver, come to a stop and re-install the cap back into the drain valve to prevent any water from re-entering the boat.
Any remaining water that may be present can be easily absorbed using a towel or sponge. This final step ensures that the interior of your inflatable boat is completely dry and ready for your next adventure on the water.
An optional plywood board can be provided separately from the air deck floor for certain inflatable boats. This plywood board serves the purpose of maintaining a flatter surface on the floor, particularly in the bow area where the keel may exert pressure and cause a slight bump on the air deck.
To install the optional plywood board, first locate the two straps on the bottom side of the air deck floor. Insert the plywood board into these straps before inflating the floor. This step ensures that the board is securely held in place and provides the desired flatness.
Next, place the deflated air deck floor inside the partially inflated boat. Spread out the air deck floor so that the round opening aligns with the valve in the boat’s keel. Position the rear of the floor to touch the transom board for stability.
Proceed to fully inflate the boat tubes, ensuring they are firm and properly inflated. Then, fully inflate the air deck floor, making sure it is evenly inflated and flat across the surface. Finally, inflate the keel to its recommended pressure.
It’s important to note that the installation of the air deck floor with the plywood board should be done with the boat partially deflated. Attempting to install the floor into a fully inflated boat can be challenging and may not yield the desired results.
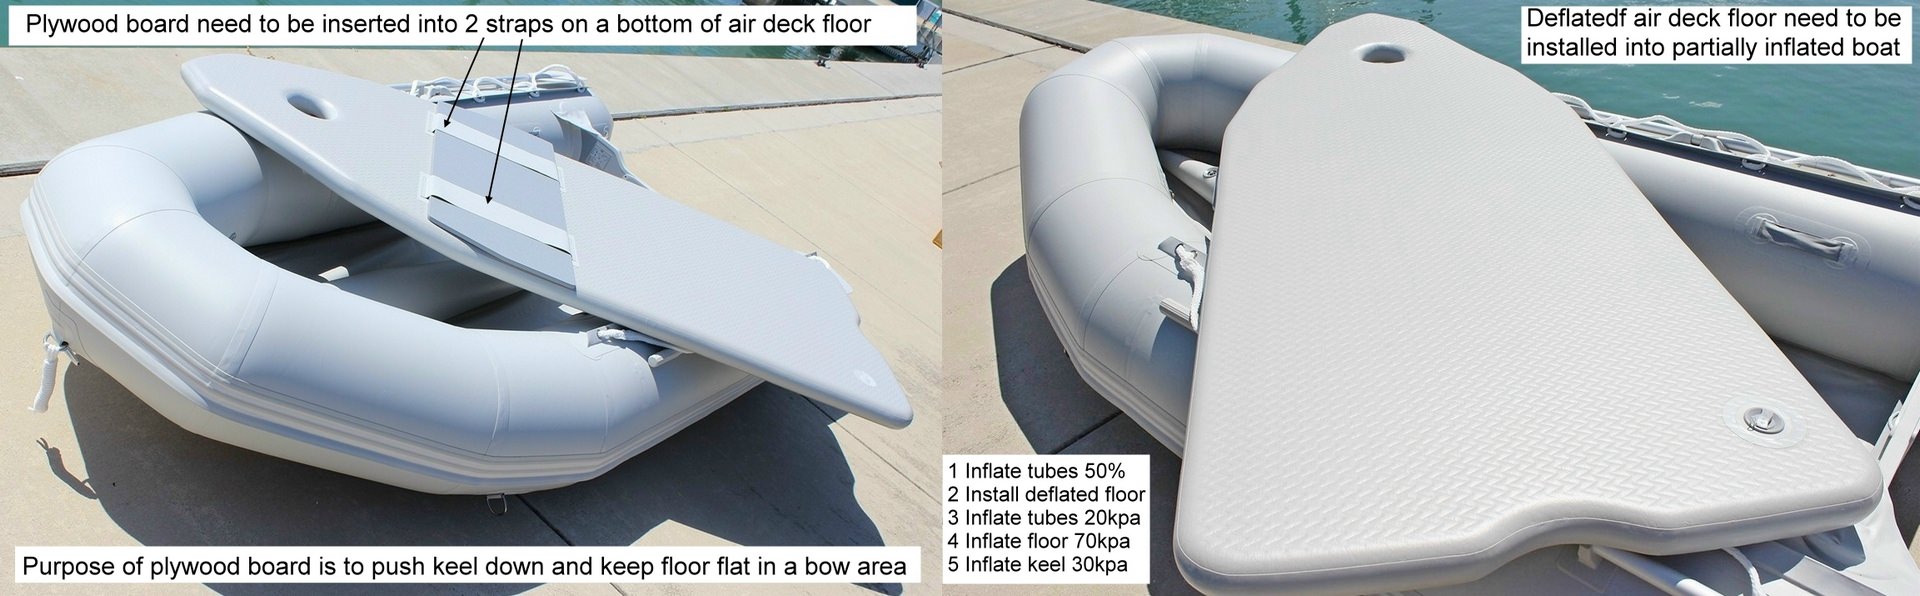
Two crucial points must be observed during the installation and inflation process of the inflatable boat’s components:
1. The keel should be inflated after the air deck floor has been fully inflated to high pressure, not before. This sequence is essential to ensure that the air deck floor provides adequate support for the optional plywood board. Inflating the keel before fully inflating the air deck floor may lead to the plywood board breaking and could potentially cause damage to the air floor. Such damage resulting from incorrect inflation sequence will not be covered by warranty.
2. It is imperative to fully inflate the air deck floor to a pressure of at least 60-80KPA. A fully inflated air floor is necessary to provide sufficient support for the plywood board, preventing it from breaking over the inflatable keel. Failing to fully inflate the air floor or inflating it after the keel has been inflated first can lead to structural issues and void warranty coverage for any resulting damages.
Adhering to these guidelines ensures the proper installation and inflation sequence, reducing the risk of damage to components and maximizing the longevity and performance of the inflatable boat.
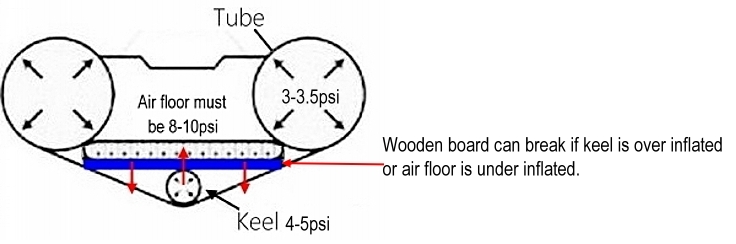
Please read more about oarlock repairs in this article.
Many inflatable vessels are designed with multiple air chambers as a safety feature. In the event that one chamber is punctured, the remaining chambers allow the inflatable vessel to stay afloat, providing an opportunity for a slow and safe return to shore. It’s advisable to carry a self-adhesive patch, such as Gorilla tape or Flex tape, along with a hand pump on board for emergencies.
If a puncture occurs while on the water, it’s important not to panic. Begin by ensuring everyone onboard is wearing a life jacket. Move any heavy loads away from the punctured chamber to prevent further strain on the damaged area. If possible, apply the adhesive patch (tape) to the puncture to slow down the leak.
Once these initial steps are taken, it’s time to start the return trip back to safety. The remaining air chambers will help keep the vessel afloat, albeit at a reduced capacity. It’s crucial to maintain calmness and focus during the return journey.
A real-life example of this scenario is showcased in a video featuring an inflatable KaBoat getting punctured during shark fishing in the open ocean. Despite the challenging conditions, the KaBoat managed to safely return to shore in rough seas. This highlights the effectiveness of having multiple air chambers and emergency repair materials onboard for unexpected situations.
Customer’s video (skip to 5:15 for puncture)
Saturn boats stand out in the inflatable boat market due to several key features and benefits that set them apart from their competitors. Here’s a detailed comparison of Saturn boats with other major brands in the PVC inflatable boat segment:
Material Quality:
- Saturn uses German Heytex PVC, renowned for its durability and resistance to the elements. This material choice ensures that Saturn boats can withstand rough conditions and maintain their structural integrity over time.
Seam Technology:
- Saturn employs heat welding seams technology on most of its boat hulls. This technology ensures airtight seals, even in hot and humid conditions, providing long-term reliability and performance.
Adhesive Quality:
- Saturn utilizes German-made Henkel Loctite and BASF glue mix technology for superior adhesion and durability in the glued parts of their boats. This ensures that critical components remain securely bonded for extended periods.
Transom Construction:
- Saturn boats feature transoms covered with fiberglass layers, offering enhanced durability compared to traditional wooden transoms. The fiberglass-PVC bond is stronger and more resistant to rotting, ensuring long-lasting performance.
Warranty:
- Saturn offers a warranty of up to 5 years, matching the warranties provided by leading inflatable boat manufacturers. This commitment to quality and customer satisfaction gives buyers peace of mind regarding their investment.
Direct Sales Model:
- Saturn’s direct-to-customer sales model allows them to offer competitive pricing by bypassing dealership chains. This approach enables customers to access high-quality inflatables at affordable prices.
Now, let’s compare Saturn boats with specific competitors:
Zodiac:
- While Zodiac is a well-established brand with a reputation for quality, Saturn offers similar durability and performance at a more affordable price point, making it a compelling choice for budget-conscious buyers.
Mercury:
- Both Saturn and Mercury offer premium-quality PVC boats with heat-welded seams. However, Saturn’s inclusion of fiberglass-covered transoms and lower prices makes it a preferable option for those seeking value without compromising on quality.
Sea Eagle:
- Sea Eagle, known for its premium boats and innovative ordering processes, competes with Saturn in terms of quality. However, Saturn’s lower prices and comparable workmanship make it a viable alternative for cost-conscious consumers.
Intex and Sevylor:
- These brands cater to the lower end of the market with thinner PVC materials. While they are more affordable, they lack the durability and features found in Saturn boats, making Saturn a superior choice for those prioritizing longevity and performance.
Takacat:
- Takacat offers unique designs but at a higher price point. Saturn provides similar quality and features at a significantly lower cost, making it a more attractive option for budget-minded buyers.
BRIS Inflatable Boats:
- BRIS boats, while affordable, may raise concerns regarding warranty and build quality. Saturn’s use of premium materials, proven manufacturing techniques, and reliable warranty support make it a more trustworthy choice for inflatable boat enthusiasts.

Newport Vessels, based in California, is primarily known for its high-quality electric trolling motors but also offers a line of inflatable boats featuring plywood and air floors. Despite their reputation for quality products, the pricing of their inflatable boats, especially those with plywood floors, can be quite high, reaching almost $1500 for a 10′ boat. This raises questions about the value proposition compared to other brands in the market, such as Saturn.
When comparing Newport Vessels’ inflatable boats with Saturn’s offerings, several factors come into play:
Price Point:
- Newport Vessels’ pricing for similar-sized inflatable boats with plywood floors tends to be higher than Saturn’s. This significant price difference may lead consumers to question whether the added cost is justified by tangible benefits in terms of quality or features.
Quality and Construction:
- While Newport Vessels’ inflatable boats are generally considered high-quality, their build and construction may not necessarily surpass Saturn’s boats. Both brands use durable materials like PVC and incorporate floor options such as plywood and air floors. Without clear evidence of superior construction or materials, the higher price of Newport Vessels’ boats may appear less justified.
Customer Satisfaction and Return Rates:
- Newport Vessels’ customer satisfaction rates and return rates for their inflatable boats, especially those with plywood floors, would provide valuable insights into the overall value and quality perception among buyers. If customers consistently find better value and satisfaction with Saturn’s boats at a lower price, it reinforces Saturn’s competitive advantage.
In conclusion, while Newport Vessels is a reputable brand known for its electric trolling motors, their pricing for inflatable boats with plywood floors may be perceived as relatively high compared to similar offerings from Saturn. Without clear evidence of superior quality, features, or customer satisfaction metrics, the value proposition of Newport Vessels’ inflatable boats in relation to their pricing remains a point of consideration for prospective buyers. This reinforces Saturn’s position as a competitive and value-driven choice in the inflatable boat market, reflected in their lower return rates and customer satisfaction levels.
It’s entirely normal to notice creases, imprints, and fold lines on a brand new inflatable vessel right out of the box, just as you would with any fabric-based product. This occurrence is due to the nature of PVC fabric, which can develop these marks when tightly folded inside a shipping box for an extended period. These creases and marks are not defects or cosmetic issues but rather a natural result of the packaging and shipping process.
A crease is essentially a line or mark formed by folding or pressing a pliable substance like fabric. In the case of inflatable vessels, the fabric can develop creases, imprints, or fold lines when it comes into contact with harder objects during shipping or storage. These marks are temporary and will gradually fade away over time, especially when the inflatable chambers are fully inflated to their maximum air pressure, giving the vessel a firm and solid structure.
The process of creases dissipating can be accelerated by warm weather conditions, as the heat helps the PVC fabric relax and smooth out. Additionally, the air pressure inside the inflatable chambers contributes to reducing these fold lines and creases. It’s important to understand that these marks are part of the normal behavior of PVC fabric and do not indicate any quality defects or aesthetic flaws in the inflatable vessel.
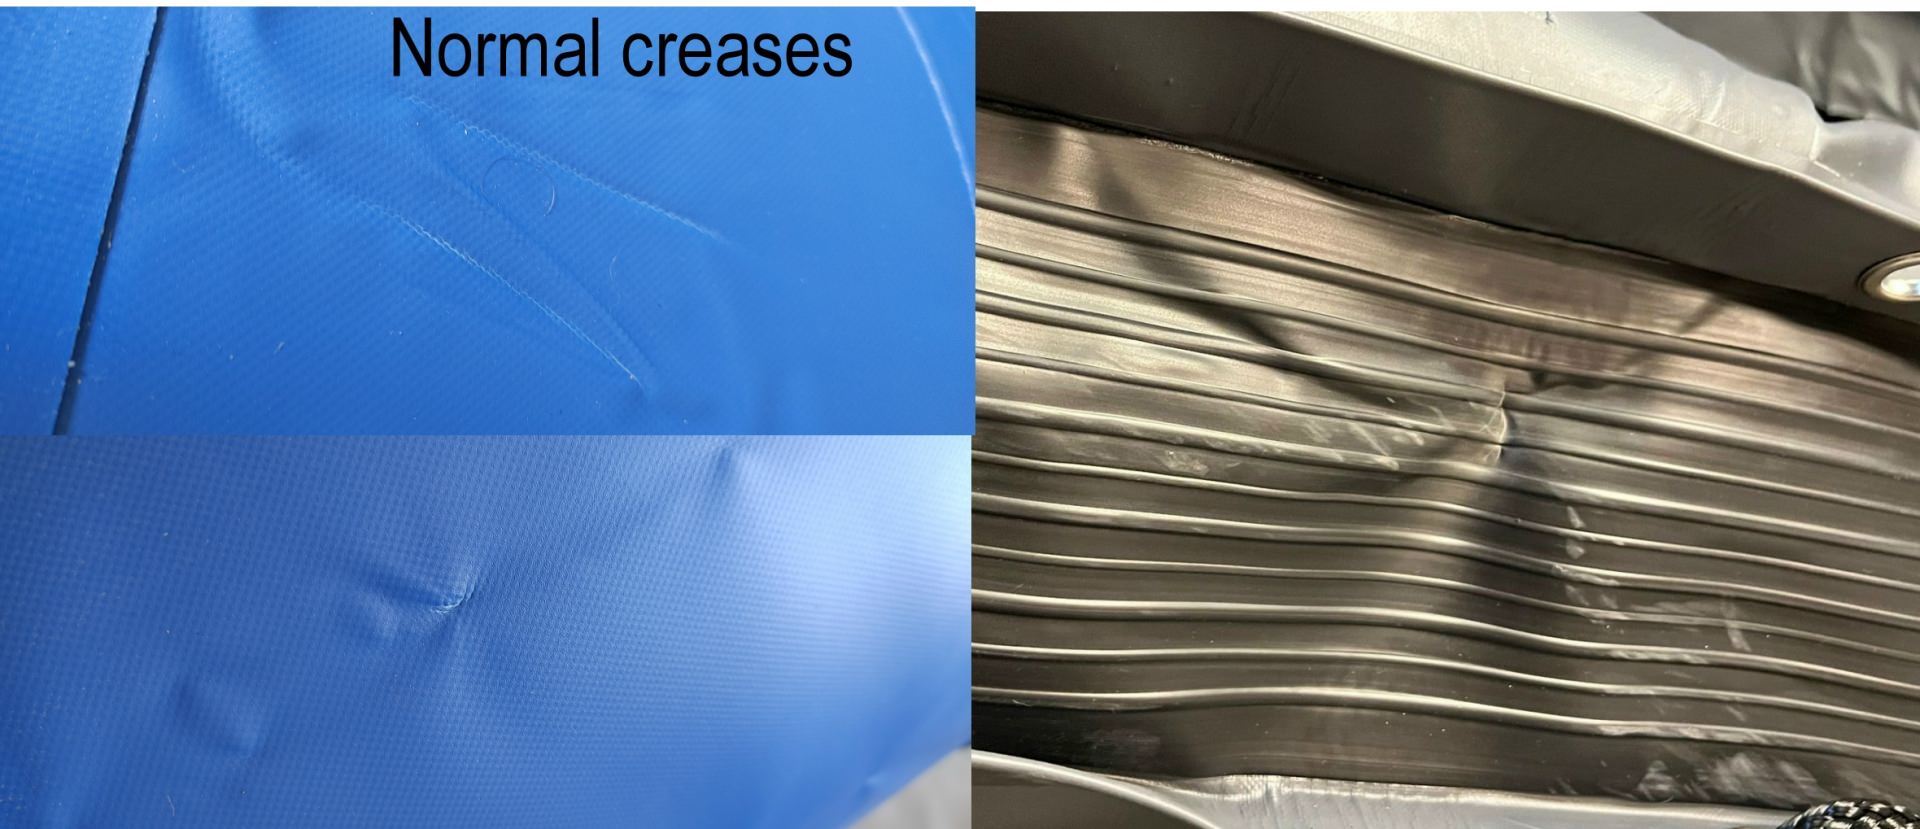
Transporting an inflatable boat, especially when it’s deflated and packed in its carry bag, can be a cumbersome task due to its weight and bulkiness. However, there are practical solutions available to ease this process and eliminate the need for heavy lifting or assistance from another person.
One convenient option is to use a folding hand cart, which can be purchased from various retailers like Amazon, with prices starting at $29. These hand carts are designed to handle the weight and size of a folded inflatable boat, making it much easier to move the boat around without straining your back or requiring extra help.
Similarly, moving dollies available at stores like Home Depot, starting at $19, provide another cost-effective solution for transporting deflated inflatable boats. These dollies are sturdy and can support the weight of the boat, allowing you to maneuver it effortlessly inside its carry bag.
Once the boat is inflated, there are additional options to facilitate movement. One method is to place the hand cart under the boat’s transom, allowing you to push the boat with ease. Alternatively, you can invest in optional dinghy wheels that attach to the boat’s transom. These wheels make it incredibly easy to move the fully inflated boat by simply grabbing the handle at the front and pulling it in the desired direction.
By utilizing these transportation solutions, you can significantly reduce the physical effort required to move your inflatable boat, whether it’s deflated and packed or fully inflated and ready for use. These options also provide added convenience and independence, eliminating the need for a second person to assist you during transportation.

When it comes to loading a heavy inflatable boat into your vehicle, there are practical strategies you can employ to make the process easier and more manageable. One effective tip is to remove the air floor from the boat before attempting to lift it. The air floor adds weight to the boat, and detaching it can significantly reduce the overall lifting effort required.
The air floor can be stored separately, which also makes the boat more compact for transportation and storage. When you’re ready to assemble the boat, simply install the air floor back into place.
Another helpful suggestion is to create a do-it-yourself (DIY) roller platform that can assist in pushing the heavy boat bag into the back of your minivan or SUV. This can be achieved using PVC plumbing tubes arranged to roll smoothly over smaller diameter tubes. These tubes can be mounted on a rectangular piece of plywood, forming a sturdy and functional platform.
By placing this roller platform in your vehicle before loading the boat bag, you create a smooth surface that facilitates pushing the heavy bag with minimal effort. This setup reduces the strain on your back and makes the loading process smoother and more efficient.
Overall, these techniques allow you to handle the transportation and loading of your inflatable boat more effectively, ensuring convenience and ease of use during your boating adventures.
The high-pressure air floor of an inflatable boat offers remarkable rigidity once fully inflated, akin to a traditional plywood floor. This rigidity allows you to stand, walk, and even jump on it, just as you would on a plywood floor.
For those who anticipate frequent inflation and deflation of their boat, the air floor stands out as the ideal choice due to its compact folding capability. Assembling an inflatable boat with an air floor is a straightforward process, simply roll it out and inflate, making it hassle-free compared to assembling a plywood floor.
While plywood floors are suitable for boats that remain inflated most of the time, they come with added weight and are more cumbersome to handle. In contrast, the air floor’s lighter weight not only makes assembly easier but also contributes to the boat’s ability to achieve higher speeds more effortlessly than a plywood floor would allow.
Moreover, the air floor offers superior comfort as it is gentler on your knees and absorbs vibrations more effectively than a rigid plywood floor. These advantages make air floors a popular choice among our customers.
Our air floors are designed with a patented plywood support above the keel in the bow section of the boat. This unique feature enhances the rigidity and flatness of the air floor, resulting in optimal performance. Unlike some competing brands with bent air floors, our flat air floors deliver superior performance and stability on the water.
- The SD260 comfortably seats 1-2 people.
- The SD290/330 accommodates 2-3 people.
- The SD365/385 can comfortably seat 3-4 people.
- The SD430 is designed for 4-5 people.
- If you store the boat on a trailer or dock, a hard floor is not an issue.
- For those who keep the boat in their car’s trunk and inflate it for a day of fishing, an air deck floor is easier to manage due to its lighter weight and quicker assembly.
|
Selection recommendation charge based on intended activity: |
|||||
| inflatable kayak | inflatable boat 7-9′ | inflatable boat 11-12′ | inflatable boat 13-15′ | inflatable river raft | |
| Yacht Tender | fair | excellent | good | good | |
| Exploring Harbors & Bays | good | good | good | excellent | |
| Coastal Areas Exploration | fair | fair | excellent | excellent | |
| Beach Cruising & Camping | excellent | fair | good | excellent | |
| Scuba In Shore | good | good | excellent | fair | |
| Scuba Off Shore | good | excellent | |||
| Fishing Ponds & Streams | good | excellent | fair | fair | fair |
| Fishing Lakes & Rivers | good | excellent | good | excellent | good |
| Saltwater Game Fishing | good | excellent | |||
| Duck Hunting | good | excellent | |||
| River Rafting | excellent | good | fair | fair | excellent |
| Lifesaving | good | good | good | ||
| Splashing around | excellent | fair | fair | fair | |
Inflatable boats primarily come in two fabric types: PVC and Hypalon (now sold as CSM, after being discontinued by its original manufacturer, Dupont). Each type has its advantages and considerations, especially regarding durability and resistance to environmental factors.
PVC Fabric:
- Advantages (Pro): PVC is notably less expensive than Hypalon/CSM, making boats made of this material more affordable.
- Disadvantages (Con): However, PVC doesn’t withstand prolonged exposure to direct sunlight as well as Hypalon/CSM. Without protection, PVC fabric can fade and become sticky over time when exposed to sunlight. It’s also less tolerant of substances like sunscreen and insect repellent compared to Hypalon/CSM.
Hypalon/CSM Fabric:
- Advantages (Pro): Hypalon/CSM boasts superior durability, especially when exposed to extended periods of direct sunlight. It can withstand fuel spills, sunscreen, insect repellent, and exhaust fumes better than PVC.
- Disadvantages (Con): The main drawback is the higher cost compared to PVC, making Hypalon/CSM boats a more significant investment.
In summary, if your inflatable boat will be subjected to prolonged periods of direct sunlight without protective measures like a boat cover or UV protectant, Hypalon/CSM is likely to last longer and maintain its quality better than PVC. However, for occasional use such as weekends or vacations, or if you can protect the boat from sunlight when not in use, PVC remains a viable and cost-effective choice.
The key takeaway is that exposure to direct sunlight is a crucial factor in determining the longevity of PVC boats. Regular use without prolonged exposure to sunlight won’t pose significant issues. For boats left outdoors all year, a simple solution like covering the boat with a tarp or using a boat cover when not in use can mitigate the effects of sunlight and prolong the life of the PVC fabric.
Please visit the Hard Floor Assembly page if you have difficulties installing your plywood floor into your inflatable boat. You may also download a Plywood Floor Assembly manual.
In the event of a puncture in an inflatable boat, raft, or kayak, it’s important to remain calm and understand the safety features designed into these vessels. Most inflatable watercraft are equipped with multiple air chambers, typically separated by internal baffles. This design ensures that even if one chamber is punctured and loses air, the remaining chambers maintain enough buoyancy to keep the boat afloat.
The presence of multiple air chambers serves as a critical safety feature. It prevents a single puncture from causing the entire vessel to sink, providing a level of redundancy and stability on the water. This feature is particularly beneficial in emergency situations, as it allows occupants time to address the issue without immediate risk of capsizing or sinking.
It’s worth noting that the buoyancy of the remaining air chambers may vary depending on the size and design of the inflatable watercraft. Larger boats or those specifically designed for rough waters may have more chambers to ensure greater safety and stability.
Overall, understanding the presence of multiple air chambers and their buoyancy capabilities should provide reassurance to users of inflatable boats, rafts, and kayaks. In the rare event of a puncture, remaining calm and following appropriate safety procedures will help ensure a safe and controlled response to the situation.
Inflatable watercraft utilize internal baffles to separate the air chambers, ensuring that each chamber remains independent in the event of an accidental puncture. These baffles serve a crucial role in maintaining buoyancy and stability, as they prevent a single puncture from compromising the entire structure. Additionally, these baffles are designed to equalize air pressure between all interconnected chambers, contributing to the overall balance and performance of the inflatable craft.
For safety and preparedness while out on the water, we strongly recommend keeping the following items on board your inflatable boat:
– Personal Flotation Devices (PFDs) for each passenger, along with a whistle for signaling in emergencies.
– A marine emergency radio to communicate with the Coast Guard or other authorities if assistance is needed.
– A reliable hand pump for inflating or re-inflating air chambers as necessary.
– A piece of durable duct tape, such as Gorilla Tape, for temporary emergency repairs.
– A small bottle of acetone to clean and prepare surfaces before applying tape for a secure seal.
In the unfortunate event of a puncture below the waterline, immediate action can help mitigate the situation. Using a hand pump to slow down the air leak can buy valuable time while assessing the damage and planning the next steps. Quick emergency repair solutions, such as the ClamSeal, are designed specifically for ripped inflatables and can provide temporary relief until a more permanent solution can be implemented.
Accessible punctures inside the boat can also be addressed temporarily using duct tape, Flex Tape, or Gorilla Tape. Prior to applying the tape, it’s crucial to clean the area around the puncture with acetone to ensure a strong and reliable seal. Once the tape is applied, inflating the affected chamber can further reduce air loss, allowing you to safely navigate to shore for proper repairs.
By following these safety recommendations and having the necessary equipment on board, you can enhance your preparedness and response capabilities in the event of punctures or emergencies while enjoying your inflatable watercraft.
The lifespan of your inflatable boat depends largely on how well you care for it. With proper maintenance, it’s possible for your boat to last anywhere from 5 to 10 years. However, neglect and improper handling can significantly reduce its longevity, potentially limiting its lifespan to just the duration of its warranty. It’s important to note that boats that have been abused or mishandled are typically not covered under warranty.
To ensure your PVC inflatable products stand the test of time, consider the following care guidelines:
Storage: Store your PVC inflatable boat in a well-ventilated and shaded area when not in use. Avoid storing it in closed containers, boxes, or areas with no ventilation, especially under direct sunlight. Humidity and heat can weaken the chemical bond of PVC glue used in assembly, leading to potential issues over time.
Humidity Management: Closed storage areas can accumulate humidity, which can further deteriorate the boat’s materials. Proper ventilation helps prevent this buildup and maintains the integrity of the PVC fabric and adhesive bonds.
UV Protection: Direct exposure to sunlight and UV rays is a common cause of premature aging in inflatable boats. This exposure can lead to fabric discoloration, fading, and damage to varnished plywood components. Using a boat cover or storing the boat in a shaded area can help mitigate these effects.
For more comprehensive guidance on selecting, caring for, repairing, and handling inflatable boats, consider referring to the book “INFLATABLE BOATS – Selection, Care, Repair, and Seamanship” by Jim Trefethen. You can find this book with the ISBN number 0-07-065252-X on platforms like www.amazon.com or by directly ordering from the publisher, The McGraw-Hill Companies, at 1-800-262-4729.
By following these care recommendations and investing in educational resources like the mentioned book, you can extend the lifetime of your inflatable boat and enjoy it for years to come while minimizing potential issues related to sun exposure and environmental factors.
Maintaining the longevity and quality of your inflatable boat is straightforward if you follow these detailed steps:
Cover or Deflate When Not in Use: One of the simplest yet most effective ways to protect your inflatable boat is to cover it or deflate it when it’s not in use. Leaving inflatables exposed to the sun, especially in local marinas or harbors, can lead to premature degradation. If feasible, deflate the boat, clean it thoroughly to remove any dirt or debris, and store it in its designated carry bag or storage container. This practice not only shields the boat from damaging UV rays but also prevents dirt buildup that can contribute to wear and tear over time.
Avoid Prolonged Exposure: Inflatable boats left exposed to the elements, particularly harsh sunlight, are at risk of deterioration. Many inflatables suffer from accelerated aging and degradation when left out in local marinas or harbors without adequate protection. By covering the boat or deflating it and storing it properly, you can significantly extend its lifespan and maintain its structural integrity.
Thorough Cleaning: Regularly clean your inflatable boat to remove dirt, salt, and other contaminants that can cause damage or discoloration. Use mild soap and water or a recommended boat cleaner suitable for inflatable materials. Pay attention to areas prone to dirt buildup, such as seams and creases. After cleaning, ensure the boat is completely dry before storing it to prevent mold or mildew growth.
Proper Storage: Store your inflatable boat in a cool, dry, and well-ventilated area when not in use. Avoid storing it in direct sunlight or in areas with high humidity, as these conditions can accelerate degradation and promote mold growth. If possible, use a boat cover or protective tarp to shield the boat from UV rays and environmental elements.
To ensure the longevity of your SATURN inflatable boat, it’s crucial to avoid certain practices that can accelerate wear and deterioration. If your boat is constantly towed behind a sailboat, left exposed year-round on a dock, or neglected in terms of cleanliness and UV protection, its lifespan will inevitably be shortened. These factors, combined with exposure to harmful UV rays, can lead to premature aging and damage to the boat’s materials.
To mitigate these risks and extend the life of your SATURN inflatable boat:
Use a Boat Cover or Tarp: Whenever possible, use a boat cover or a protective tarp to shield your boat from direct sunlight and environmental elements. This simple measure can significantly prolong the boat’s lifespan by reducing UV exposure and minimizing the effects of weathering.
Maintain Cleanliness: Keep your boat clean and free of dirt, salt, and debris. Regularly rinse the boat with fresh water after use to remove any residues that could cause discoloration or deterioration. Avoid using chemical detergents or harsh cleaners that may damage the fabric. Instead, opt for boat cleaners specifically designed for inflatable materials, such as those available from Inland Marine USA.
Avoid Sunscreen Lotions: Be mindful of using sunscreen lotions or other skincare products that may contain ingredients harmful to the boat’s fabric. Some chemicals in these products can cause discoloration or make the fabric sticky over time. If sunscreen is applied, ensure that the boat tubes are cleaned promptly to prevent any adverse effects.
Choose Recommended Cleaners: When cleaning your boat, use boat cleaners recommended by reputable sources, such as Inland Marine USA. These cleaners are formulated to be safe and effective for use on inflatable materials, ensuring that your boat remains in top condition without causing damage or degradation.
When it comes to cleaning your inflatable boat, it’s crucial to use cleaning solutions that are specifically approved for PVC fabrics. Avoid using household cleaners like CLOROX or Windex, as well as any other chemicals not intended for use on inflatable materials. These types of cleaners can cause the PVC fabric to become sticky over time, leading to potential issues and deterioration.
Additionally, be cautious when using sunscreen lotions, as some formulations may contain silicon or other ingredients that can also make the PVC fabric sticky. If sunscreen is applied to the boat, make sure to thoroughly clean the boat tubes to remove any lotion marks or residues. This simple step can help extend the life cycle of the boat fabric and prevent unwanted stickiness.
For cleaning and maintaining your inflatable boat, consider visiting your local West Marine store. They typically carry a variety of inflatable boat cleaners, protectants, and boat paints that are specially formulated and approved for use on PVC fabrics. These products are designed to effectively clean and protect your boat without causing damage or undesirable effects.
By using approved cleaning solutions and products designed specifically for PVC fabrics, you can ensure that your inflatable boat remains in excellent condition for years to come. Proper care and maintenance play a key role in preserving the integrity, appearance, and performance of your boat, allowing you to enjoy many memorable adventures on the water.
We highly recommend using Swipes Wipes for cleaning inflatable boats due to their exceptional cleaning solution specifically formulated for such boats. These wipes offer a convenient way to maintain and protect your inflatable boat’s surface. They effectively eliminate various types of dirt, grime, and residue while providing protection against harmful UV rays that can degrade the boat’s material over time.
To illustrate the effectiveness of Swipes Wipes, consider the following scenario involving two identical Saturn boats that were purchased simultaneously and owned by different customers in Puerto Rico, each subjected to different maintenance practices:
The first boat, left uncovered and exposed to the elements over four years, likely accumulated dirt, dust, and environmental debris. Without proper protection, UV rays could have also caused gradual damage to the boat’s surface, leading to discoloration and potential material weakening.
On the other hand, the second boat was diligently maintained. It underwent regular cleaning using Swipes Wipes, which not only removed accumulated dirt but also formed a protective barrier against UV rays. Additionally, this boat was covered with a boat cover when not in use, further shielding it from direct sunlight and harsh weather conditions.
As a result of these contrasting maintenance approaches, the difference in appearance and condition between the two boats is significant. The boat that received regular cleaning and protection appears almost new, with a well-maintained surface that reflects its care and attention to detail. In contrast, the uncovered boat likely shows visible signs of wear, including faded colors, surface blemishes, and potentially compromised material integrity.
In conclusion, Swipes Wipes offer a practical solution for inflatable boat owners, helping them preserve the aesthetics and longevity of their watercraft. By incorporating these wipes into a regular maintenance routine and using proper protective measures such as boat covers, owners can enjoy their boats for years to come while minimizing the effects of environmental wear and tear.
| |
When comparing the two Saturn boats in Puerto Rico, the one that was covered and diligently maintained with Swipes Wipes stands out as the well-preserved vessel. Its surface remains vibrant and free from the signs of aging that often result from prolonged exposure to the elements, such as UV rays, dirt, and moisture.
In contrast, the uncovered boat displays the consequences of prolonged sun exposure and neglect. Its once-bold colors may have faded, the surface could be marred by dirt and grime, and there may be signs of material degradation due to UV rays.
For our friends and customers in hot and humid regions like South Florida, Texas, and LA, it’s crucial to understand the impact of environmental conditions on inflatable boats. Garages, especially in summer, can become extremely hot, exceeding 100 degrees Fahrenheit, and the prolonged humidity can further accelerate damage to inflatable boat materials.
Saturn advises owners to take proactive measures to protect their inflatable boats. This includes covering the boat when not in use to shield it from direct sunlight and humidity. Additionally, deflating the boat for storage in a climate-controlled area within the home can prevent the detrimental effects of heat and moisture buildup.
It’s also essential to release excess pressure from the boat’s tubes and floor before storage, as heat can cause the air inside the vessel to expand, potentially leading to burst seams. These precautions may seem minor but can significantly extend the lifespan of inflatable boats, ensuring they remain in optimal condition for years beyond their warranty period.
Taking proper care of your inflatable boat can yield long-term benefits, potentially extending its usability well beyond a decade. An example of this longevity can be seen in a Craigslist ad from March 2015, showcasing a 2003 Saturn inflatable boat still in excellent condition after over ten years of use—a testament to the benefits of diligent maintenance and protective measures.
To register your vessel for use with an outboard motor, several essential documents are required: a Manufacturer Certificate of Origin (MCO), a Bill of Sale (BOS), and an invoice demonstrating the amount paid. These documents are typically included inside the shipping box when you purchase your vessel. Once registered, you will receive the title by mail.
Should any of these vital documents be missing, replacements can be obtained from the Downloads page on our website at https://inflatableboat.net/. On this page, you will also find an example detailing how to correctly fill out the MCO and BOS forms. It’s crucial to fill in all necessary information by hand using a pen, including the purchase price, your name, address, and the date of purchase. If you have any questions during this process, feel free to email us for assistance.
When filling out the MCO and BOS, be sure to include the vessel’s length, width, and year, which can be determined from the last two digits of the Hull Identification Number (HIN). The HIN number itself can be found on the transom of your vessel, on a PVC strip glued to its side, or on the side of the shipping box below the model number. The HIN number should begin with the letters “VEJ.”
It’s important not to bring blank forms to the registration office, as they will not be accepted. All forms must be completed before visiting the registration office. If you encounter difficulties with handwriting, we are more than happy to fill out the forms for you.
Notably, the section requiring notarization should be left blank on the MCO form unless you are selling your boat to a private buyer who will register it for the first time. Notarization is not necessary for registration if you purchased your boat from BoatsToGo, as we are a manufacturer registered with the US Coast Guard.
If a registration office insists on notarization despite proper documentation, we can provide a notarized copy of the Manufacturer’s Statement of Origin (MSO) for a fee of $40. You can make this payment at https://inflatableboat.net/.
In cases where registration is challenging due to specific office requirements or issues with the paperwork’s legibility, such as requiring “wet” hand signatures, consider visiting a different tag agency or window within the same agency. Different agencies may have varying interpretations of registration requirements.
If your registration is rejected for any reason, including the need for manual signatures or printing issues, contact us, and we will promptly mail you new registration documents with hand signatures. We are committed to ensuring a smooth registration process for our customers.
Saturn inflatable boats and rafts are renowned for their exceptional quality and craftsmanship. Despite this, our commitment to offering affordable prices leads us to make thoughtful choices regarding included accessories. Instead of including a costly high-quality hand pump and passing on the expense to you, we provide a good-quality generic hand pump with each boat as a complimentary gift.
While the hand pump we include is of good quality, there are rare instances where mishandling during shipping, such as dropping by FedEx, may cause minor issues. Specifically, the weight of the boat in the shipping box could occasionally lead to small cracks in the hose of the pump. However, a quick fix for such cracks is to apply duct tape around the affected area, restoring the pump to full functionality.
Should you encounter any such issue with your hand pump, whether due to shipping mishaps or performance concerns, we offer solutions to ensure your satisfaction. If the hose develops cracks, applying duct tape is the quickest remedy. Alternatively, if you prefer a new pump, you can send the damaged one back for a replacement. The return address can be found by clicking here.
In cases where the hose remains intact but the pump fails to provide adequate pressure for inflating the boat, you can troubleshoot by unscrewing the green cup with a T-handle and examining the rubber seal on the plunger. If this seal is torn or damaged, please notify us, and we will promptly send you a replacement seal.
Additionally, it’s important to note that we offer high-performance manual and high-pressure electric pumps through our Accessory section. These pumps are designed to meet specific inflation needs and can enhance your overall boating experience by providing efficient and reliable inflation capabilities.
Our goal is to ensure that your experience with Saturn inflatable boats and accessories is hassle-free and enjoyable. We strive to address any issues promptly and provide solutions that meet your needs, whether through quick fixes like duct tape or replacements for damaged components.
As part of our commitment to ensuring customer satisfaction, we recommend conducting a thorough inspection of the hand pump included with your Saturn inflatable boat or raft. Here are the steps you should take to ensure the pump’s optimal performance:
Check for Hose Holes: Before using the hand pump, carefully inspect the hose for any signs of damage, including small holes or cracks. Ensure that the hose is free from any leaks that could affect its ability to inflate your boat effectively.
Inspect Valve Adapter: Additionally, examine the valve adapter attached to the pump. Look for any visible damages such as cracks or deformities that may hinder its functionality. A damaged valve adapter can lead to air leakage during inflation, so it’s crucial to address any issues promptly.
Contact Us: If you discover any problems with the hand pump, such as hose holes or damaged valve adapters, please don’t hesitate to contact us via email. Our customer support team is ready to assist you and provide guidance on how to resolve the issue.
By conducting these checks before using the hand pump, you can ensure a smooth and hassle-free inflation process for your Saturn inflatable boat or raft. Your satisfaction is our priority, and we’re here to help address any concerns or issues you may encounter with the hand pump or any other accessories.
Our range of inflatables is versatile and suitable for various water activities such as fishing, diving, snorkeling, spearfishing, and more. However, it’s crucial to ensure safety measures are followed, especially when handling fish around the inflatables.
One important consideration is the sharpness of fish pectoral fins, which can pose a risk of puncturing the PVC or Hypalon fabric of the inflatable. Even small fish can have remarkably sharp fins that may create micro punctures, leading to slow leaks that might not be immediately noticeable.
To mitigate the risk of accidental punctures by fish fins, we recommend the following precautions:
Exercise Caution: Always handle fish with care around your inflatable. Be mindful of their sharp fins and avoid letting them come into direct contact with the air-filled chambers.
Use a Fish Basket or Cooler: When catching or transporting fish, use a basket or cooler to contain them. This prevents the fish from jumping around and potentially puncturing the boat accidentally.
Attach a Collapsible Fish Basket: Consider attaching a collapsible fish basket to the outside of the boat using a rope. This keeps the fish separate from the inflatable’s fabric, reducing the risk of damage.
Inspect for Micro Punctures: Periodically inspect your inflatable for any signs of micro punctures caused by fish fins. These may manifest as slow leaks that become noticeable over time. If detected, these small holes can be easily repaired by applying a drop of suitable glue.
For comprehensive details regarding the inclusions with each item, we encourage you to refer to the product page description specific to the inflatable boat or raft you are interested in. However, in general, here’s an overview of what you can expect with most of our boats:
Seat Bench: Most boats come equipped with at least one seat bench, providing comfortable seating for your water adventures.
Standard Inclusions:
- Hand Pump: Each boat includes a hand pump for convenient inflation.
- Repair Kit: A repair kit is included to address any minor damages that may occur during use.
- Carry Bag: A carry bag is provided for easy transport and storage of your inflatable.
- Aluminum Oars: Aluminum oars are included for efficient rowing or paddling.
- 4′ Rope: A 4-foot rope is included for securing your boat or for other purposes as needed.
- Floor Option: Depending on the model, your boat will come with either an air floor or an aluminum floor, each offering unique benefits and stability.
Optional Second Bench: When placing an order online, depending on the model, you may have the option to include a second bench for additional seating capacity. This can be specified during the ordering process.
Plywood Floors: Please note that we no longer offer plywood floors with our boats. Instead, we focus on providing durable and efficient air or aluminum floors.
Additionally, for a comprehensive range of optional accessories and spare parts, we invite you to visit our Accessories-Parts page. Here, you’ll find a variety of add-ons to enhance your boating experience and replacement parts to maintain your inflatable in optimal condition.
Click here for step-by-step instructions for deflating and folding your boat.
We highly recommend considering the installation of a hydrofoil on your outboard motor to enhance both speed and boat handling. A hydrofoil attachment offers several benefits that can significantly improve your boating experience.
Improved Speed: One of the primary advantages of installing a hydrofoil is the enhancement in speed. The hydrofoil helps lift the stern of the boat, reducing drag and allowing it to reach planing speeds more quickly. This results in a smoother and faster ride, especially during acceleration.
Enhanced Boat Handling: Alongside speed improvements, a hydrofoil contributes to better boat handling. It helps stabilize the boat by reducing bow rise, making steering more responsive and precise. This is particularly beneficial when maneuvering in rough waters or making sharp turns.
Quick Planing: The hydrofoil’s design facilitates quicker planing of the boat. It aids in getting the hull out of the water, which is essential for achieving optimal performance, especially with heavier loads or when towing water sports enthusiasts.
Maintained Planning Effect: Even at lower speeds, a hydrofoil helps maintain the planning effect. This means you can enjoy smoother cruising and better fuel efficiency during extended periods of boating at reduced speeds.
To illustrate the difference, take a look at the comparison image below. On the left side is a boat without a hydrofoil, and on the right side is the same boat with a hydrofoil installed. The visual representation clearly demonstrates how the hydrofoil improves the boat’s posture in the water, leading to enhanced performance.
You can easily find hydrofoils at reputable marine stores such as West Marine, Amazon, online retailers, or even in the boating section of stores like Walmart. Prices typically start at $25, making it an affordable and worthwhile investment for the improved boating experience it offers.
The air floor of our inflatable boats, made from PVC material, is engineered to be robust and resistant to punctures. However, it’s essential to be mindful of potential causes of damage, particularly when dealing with sharp objects or debris that could compromise the floor’s integrity.
While dog claws are generally not sharp enough to puncture the air floor, certain sharp objects like knives, fishing hooks, or small pieces of broken glass can pose a risk if enough pressure is applied. Additionally, objects picked up on the insoles of shoes, such as small shards of glass, can inadvertently cause cuts or punctures to the air floor during boarding.
To safeguard the high-pressure air floor and maintain its pristine condition, we recommend using a protective layer of vinyl floor covering or carpeting. Here’s a detailed guide on how to apply this protective covering:
Purchase Suitable Material: Visit a hardware store to acquire a piece of vinyl floor covering or opt for regular carpeting. These materials provide a durable and protective layer for the air floor.
Create a Template: Start by creating paper patterns to accurately measure and cut the vinyl or carpeting to fit the inside of your boat and cover the floor completely. This step ensures a perfect fit and maximum coverage.
Cutting the New Flooring: Transfer the measurements from your paper patterns to the vinyl or carpeting and carefully cut out the new flooring material using sharp scissors or a utility knife.
Application: Lay the cut vinyl or carpeting over the air floor, ensuring it covers the entire surface area securely. The protective covering acts as a barrier against sharp objects, reducing the risk of punctures and maintaining the air floor’s durability.
There are various options available for floor protection, including:
- Anti-Fatigue Grip Mat Roll
- Marine Carpet
- Diamond Plate Rubber Flooring Rolls
- Corrugated Rubber Floor Mat
- Runner Mats
- Hardwood Floors Chair Mat Floor Protector
- Recycled Rubber Roll Mat
- Self-Adhesive EVA Deck Foam
- Yoga Foam Mat Roll
These options offer different levels of thickness, texture, and durability to suit your preferences and needs. Additionally, the flexible nature of floor vinyl covering or carpeting allows for easy storage by rolling it up when the boat is deflated.
By implementing these protective measures, you can effectively make your inflatable air floor virtually indestructible, ensuring many enjoyable outings on the water without concerns about potential damage.
Please see our Blog entry “How to protect air deck floor from accidental punctures.” for more information and pictures.
A towing bridle is an indispensable component for safely towing your inflatable boat, and you can easily find towing bridles at various marine retail stores or online. It’s crucial to understand the correct procedures for towing to avoid damage and ensure safety.
Towing Attachment Points: Avoid connecting the towing rope directly to the central D-ring with an integrated handle. Instead, utilize the designated towing D-rings located on both sides of the dinghy’s bow. This distributes the towing load evenly and reduces strain on the boat’s structure.
Boat Trailer Considerations: When using a boat trailer, take care not to pull a heavily loaded boat with an outboard motor over dry bunks. Doing so can risk damaging the front D-ring, which may rip off under excessive strain. Opt for using side towing D-rings or install rollers on the trailer to facilitate smoother and safer towing operations.
Proper Towing Bridle Setup: One common mistake in towing is improperly rigging the towing bridle. Avoid creating a loop at the center of the tow bridle and attaching the towing line there. Instead, ensure the towing line ends in a small bowline loop, through which the bridle passes. This setup allows the towline to move back and forth within the bridle, distributing tension evenly to both sides and reducing stress on the pad eyes of the dinghy.
Towing with Outboard Motors: While many sailors have small outboard motors for their inflatables, it’s generally recommended to remove the motor before towing. Leaving the motor attached can pose various hazards, including the risk of submerging the motor in large seas or it falling off the dinghy transom due to violent motion. Additionally, the added weight of the motor significantly increases the tow load, potentially leading to water ingress and strain on the bridle pad eyes.
Load Distribution and Water Ingress: Unequal load distribution, especially with added weight like an outboard motor, can lead to shipping water aboard the inflatable. This can strain the bridle pad eyes, causing potential failure, especially when load equalization isn’t maintained. Even a small amount of water inside the inflatable can drastically increase the load, emphasizing the importance of proper towing techniques and load management.
By adhering to these detailed guidelines, including using a towing bridle correctly, selecting appropriate attachment points, and considering the impact of outboard motors on towing safety, you can ensure a safer and more efficient towing experience for your inflatable boat while minimizing the risk of damage and ensuring overall boating safety.
When transporting inflatable boats on a trailer with the outboard motor raised, it’s important to be mindful of the potential strain that heavy outboard engines can exert on the boat’s transom. This is particularly evident when the trailer encounters bumps or uneven pavement during transit, which can lead to damage to the transom if the motor’s weight isn’t properly supported.
To mitigate this risk and provide additional support for the outboard motor’s weight during transportation, you can consider installing a pole support. These supports are designed to extend from the end of the trailer to the end of the outboard motor, effectively distributing and bearing the weight of the motor to prevent undue strain on the boat’s transom.
Here are some detailed points to consider regarding the installation of a pole support:
Purpose of Pole Support: The primary function of a pole support is to provide extra stability and reinforcement for heavy outboard motors while the boat is being transported on a trailer. By extending the support from the trailer to the motor, it helps distribute the weight more evenly and reduces the risk of damage to the transom caused by sudden movements or bumps.
Availability: Pole supports for outboard motors are readily available at stores that sell trailers for boats, as well as online outlets. They come in various designs and configurations to suit different trailer setups and motor sizes.
Installation Process: Installing a pole support typically involves securing one end of the support to the end of the trailer and the other end to the outboard motor. The support should be adjusted to provide adequate height and stability, ensuring that it effectively bears the weight of the motor throughout the journey.
Benefits of Pole Support: The use of a pole support offers several benefits, including:
- Minimized strain on the boat’s transom, reducing the risk of damage.
- Enhanced stability and balance during transportation, especially on rough roads or uneven terrain.
- Protection for the outboard motor from excessive movement or impact while on the trailer.
By investing in and properly installing a pole support for your outboard motor during transportation, you can significantly reduce the potential for transom damage and ensure a safer and more secure towing experience for your inflatable boat.
Saturn Inflatable boats are crafted using top-quality materials comparable to those used by renowned, higher-priced brand name inflatable boats available in retail marine stores. In fact, our commitment to exceptional workmanship ensures that the quality of our boats equals or even surpasses that of many overpriced brand names in the market.
Here are some key strengths and features of Saturn boats that set them apart:
Clean, Hand-Made Seams: Our boats boast impeccably crafted seams where the glue is seamlessly integrated, leaving no protrusions or imperfections.
Double Layer Fabric at the Bottom: All tubes are reinforced with double-layer fabric at the bottom, enhancing durability and resistance to wear and tear.
Thick 1100 Dtex Fabric: We use an extra-thick 1100 Dtex fabric with polyester support, significantly thicker than fabrics utilized by some other renowned brands. This robust fabric enhances the boat’s longevity and performance in various conditions.
Flat and Rigid Air Floor: Unlike many other brands, our air floors are flat and rigid throughout, without any bending in the front. This design ensures stability and comfort while onboard.
Safety Valve: Our boats are equipped with safety valves that prevent over-inflation, ensuring optimal air pressure for safe and efficient use.
Now, let’s delve into the factors contributing to our competitive pricing and why Saturn boats offer excellent value:
Direct Importing: We source our boats directly from the manufacturer, eliminating intermediaries and associated markups.
Online Business Model: Operating primarily online helps us avoid the overhead costs that retail stores typically pass on to customers, allowing us to offer more competitive prices.
Minimal Marketing Expenses: Unlike some major brands heavily invested in marketing, we focus on delivering quality products without excessive marketing expenditures, further reducing costs.
Streamlined Distribution: Our business model doesn’t rely on maintaining an extensive network of dealers and retail outlets, leading to cost savings that benefit our customers.
2-Year Warranty: Our warranty model is straightforward, offering a 2-year warranty without adding extra years that inflate retail prices unnecessarily.
The feedback from our satisfied customers, many of whom have prior experience with leading brands like Zodiac, Avon, and West Marine, speaks volumes. Numerous customers have expressed surprise at the exceptional quality of Saturn boats, often stating that they exceed their expectations. A significant portion of our sales comes from referrals by delighted Saturn boat owners, highlighting the trust and satisfaction our customers have in our products.
In summary, Saturn Inflatable boats combine superior quality, innovative features, and competitive pricing, making them a preferred choice for boaters seeking outstanding performance and value for their investment.
Saturn inflatable boats and KaBoats are ideally suited for short shaft 15″ outboard motors, which are recommended for optimal performance and compatibility with the boat’s design. It’s crucial to consider the weight of the outboard motor, as lighter motors tend to offer better handling and efficiency on the water. Both 2-stroke and 4-stroke engines can be installed on the boat’s transom, but 2-stroke engines are generally lighter than their 4-stroke counterparts, making them a preferred choice for some users.
While long shaft 20″ motors are not recommended due to potential extra underwater drag, they can still be installed if a short shaft motor is unavailable. In such cases, a long shaft outboard motor can be raised a few inches using a 2-3″ wooden bar placed on top of the boat’s transom. However, it’s important to note that this setup may affect the boat’s performance and handling to some extent.
The term “Max O/B motor” refers to the maximum recommended outboard motor power output specified in the technical specifications for Saturn inflatable boats. This indicates the horsepower rating at which the boat can plane effectively, especially when carrying the maximum recommended capacity of passengers and gear. For instance, a Saturn SD365 inflatable boat can accommodate up to a 30 HP outboard motor. However, a 9HP or 15 HP motor can provide excellent performance with a smaller number of passengers, typically 2-3 people onboard.
To achieve planing with a full load of 5 people and gear, a higher horsepower motor, such as a 30 HP outboard, may be necessary. This ensures sufficient power and thrust to lift the boat onto a plane, allowing for smoother and more efficient navigation, especially in conditions where maximum capacity is utilized.
In summary, selecting the right outboard motor for your Saturn inflatable boat involves considering factors such as shaft length, weight, and horsepower, as specified in the technical guidelines. This ensures optimal performance, handling, and safety while enjoying your boating experience.
The Manufacturer Identification Codes (MIC) were officially assigned to us by the US Coast Guard on May 6, 2003. This code serves as a unique identifier for our company in the marine industry, indicating our compliance with regulations and standards set by maritime authorities.
Furthermore, our boats have undergone rigorous testing and certification processes to meet international standards. They are certified by CE (Conformité Européenne), ISO (International Organization for Standardization), and Germanischer Lloyd in Europe, Asia, and Australia. These certifications attest to the quality, safety, and adherence to established norms in different regions, ensuring that our products meet the highest industry standards globally.
While the NMMA (National Marine Manufacturers Association) certification is available and recognized, it is considered optional and comes with associated costs. In our efforts to maintain competitive pricing and keep our expenses in check, we have chosen not to pursue NMMA certification. This decision allows us to offer our customers high-quality products without unnecessary additional expenses, ultimately contributing to keeping our prices affordable and accessible to a wider audience.
By prioritizing essential certifications such as CE, ISO, and Germanischer Lloyd, we demonstrate our commitment to meeting stringent quality and safety requirements while remaining mindful of cost considerations. This approach enables us to deliver reliable and certified inflatable boats to our customers while ensuring value and affordability in our offerings.
The inflation valve of our inflatable boats features a spring-loaded pushpin mechanism that serves a crucial role in managing air pressure within the air chambers. Understanding how to operate this valve correctly is essential for proper inflation and deflation of your boat.
Here’s a detailed guide on how to use the inflation valve effectively:
Pushpin Positions: The pushpin inside the inflation valve can be locked into two positions: up or down. When the pushpin is pressed down into the valve, it allows air to escape, facilitating deflation. Conversely, when the pushpin is in the upper position, it locks the air inside the chamber, preventing air from escaping through the valve.
Pre-Inflation Check: Before connecting the air pump valve adapter to the valve, ensure that the pushpin is in the upper, popped-up position. This ensures that the valve is sealed and ready for inflation.
Inflation Process: a. Insert the air pump valve adapter into the valve and rotate it clockwise to latch onto the crest inside the valve securely. b. Begin inflating the air chamber using the air pump until it reaches the desired air pressure. The chamber should feel hard to the touch, with no visible wrinkles on the surface.
Disconnecting the Pump Adapter: After inflating, rotate the air pump valve adapter counter-clockwise to disconnect it from the valve. This action will seal the valve automatically using the pushpin, preventing air from escaping.
Deflation Procedure: If you need to deflate the boat later on, press down on the pushpin inside the valve and turn it in any direction until it stays in the pressed-down position. This unlocks the valve, allowing air to escape freely from the tubes, facilitating deflation.
By following these steps and understanding how the inflation valve and pushpin mechanism operate, you can ensure efficient and effective inflation and deflation of your inflatable boat, maintaining optimal air pressure for safe and enjoyable boating experiences.
Here’s a step-by-step guide on how to replace a valve on your inflatable boat:
Visit the Valve Assembly Page: Start by visiting the dedicated valve assembly page on our website. This page contains comprehensive instructions and tools necessary for valve replacement.
Order Replacement Parts: If you need to replace a valve, you can order replacement valves and the required tools directly from our website. Simply follow the link provided to access the ordering page.
Unscrew the Top Part: To replace the valve, begin by unscrewing the top part of the existing valve assembly. This step allows you to access the interior components of the valve for cleaning or replacement.
Clean or Replace the Valve: If your valve is simply dirty or has a minor issue, cleaning the rubber seal inside the valve may resolve the problem. However, if the valve is damaged or defective, you can replace it with a new valve from our replacement parts selection.
Screw in the New Valve: Once you have cleaned the valve or replaced it with a new one, screw the new valve securely into place using the appropriate tools. Ensure that the valve is tightly sealed to prevent air leaks.
Under normal circumstances, with half of a maximum persons/load capacity, or about 50% of the maximum O/B power rating may be necessary to put the boat on plane. For example: the SD365 is rated for up to a 30 HP outboard motor. But a 15 HP with hydrofoil installed would be enough to put a 12′ boat on plane with 1-4 people and a light load.
The lighter the motor, the faster boat will run. 2-stroke engines, while still possible to find, are much lighter then 4-strokes, and will provide same power at less strain to the transom. Max O/B Motor means: the maximum power outboard motor that can be safely used to plane a boat loaded to the maximum capacity on normal water surface conditions. Please exercise common sense and caution when using maximum motor capacities. Do not jump from wave to wave as new 4-stroke motors are much heavier then 2-strokes and provide extra strain on the transom.
Prepare for Inflation: a. Ensure all valves are closed before starting the inflation process. b. Lay out the deflated boat on a flat surface, ensuring there are no sharp objects that could damage the material.
Inflate Tubes to 75% Full: a. Begin by inflating all tubes to approximately 75% full using a suitable air pump. b. Monitor the inflation to ensure even pressure distribution across all tubes.
Insert Boat Seats: a. Insert the boat seats into their designated spots on the boat, following the manufacturer’s instructions.
Place Deflated Air Floor: a. Position the deflated air floor inside the boat with the gray plywood board facing the keel. b. Ensure that the valve of the keel is accessible through the hole in the air floor for later inflation.
Secure Plywood Boards: a. Place both ends of the plywood boards under the left and right sides of the tubes to secure them in place. b. Ensure the air floor is properly aligned and stretched along the boat’s bottom, covering it from the nose to the transom.
Inflate the Air Floor: a. Begin inflating the air floor using the air pump until it becomes hard to the touch. b. You’ll notice the air pressure pushing the air pump handle up, indicating that the floor is fully inflated. c. Ensure the floor is evenly inflated without any wrinkles or sagging.
Fully Inflate Tubes: a. Proceed to inflate all tubes to 100% capacity until they are hard to the touch. b. Check for any areas that may require additional inflation to achieve uniform pressure across all tubes.
Inflate the Keel: a. Inflate the keel through the designated hole in the air floor using the appropriate valve and air pump attachment. b. Inflate the keel until it reaches the recommended air pressure, ensuring it provides proper stability and buoyancy.
Steps for assembly inflatable boat with plywood floor. Click image to zoom in:
You don’t need to have an air pressure gauge to properly inflate Saturn boats. Generally, you can gauge the inflation level by touch and feel. When the boat tubes and floor feel hard to the touch and it becomes challenging to pump more air in, it indicates that the boat is adequately inflated and ready for use. This tactile approach is sufficient for most manual inflation methods.
However, if you’re using a high-pressure electric air pump, it’s crucial to follow specific guidelines to prevent over-inflation, which can lead to damage:
Monitor Inflation by Touch: As you inflate the boat using a high-pressure electric pump, periodically check the firmness of the tubes and floor by touching them. Stop pumping when they feel sufficiently hard to the touch.
Avoid Excessive Pressure: High-pressure pumps can quickly over-inflate the boat if not monitored carefully. Avoid pumping air beyond the point where the tubes and floor feel hard and resistant to further inflation.
Use Pump’s Pressure Gauge: If your high-pressure electric pump is equipped with a pressure gauge, use it to monitor the air pressure levels. Refer to the manufacturer’s recommended air pressure specifications for your specific boat model.
Follow Manufacturer’s Recommendations: Always follow the inflation guidelines provided by Saturn for your specific boat model. These guidelines typically include recommended air pressure levels for optimal performance and safety.
Prevent Consequential Damage: Over-inflation can lead to damage such as burst seams or stress on the boat’s material. By inflating the boat to the appropriate firmness, you can avoid such issues and prolong the lifespan of your inflatable boat.
- Pressure Units Conversion:
- 1 psi (pounds per square inch) = 0.06895 bar (bars)
- 1 bar = 14.50326 psi
- 1 kPa (kilopascal) = 0.145 psi
These conversion factors allow you to convert between commonly used pressure units such as psi, bar, and kPa, which may be encountered when dealing with inflatable boat air pressure.
Additionally, some boats may come equipped with a Safety Release Valve (SRV). Understanding how the SRV functions and its requirements is important for proper boat maintenance and safety:
SRV Functionality:
- The SRV is designed to release excess air from the boat’s chambers in specific situations.
- It operates effectively when all chambers are inflated to approximately the same level of pressure.
- Air pressure can propagate between chambers through internal separators with conical shapes. These separators are not flat like drums but are cone-shaped and installed between chambers.
Proper Inflation for SRV Operation:
- To ensure the SRV functions correctly, it’s essential to inflate all chambers to a similar level of pressure initially.
- If one chamber is not fully connected to the SRV due to uneven inflation, the SRV may not work as intended.
- It’s important to note that the SRV is not designed to prevent over-inflation but rather to release excess air. Over-inflation can still occur if chambers are inflated beyond recommended levels.
SRV Purpose:
- The SRV serves as a safety feature to release excess air if chambers become overheated, especially when exposed to direct sunlight, or when the boat is taken to higher altitudes after inflation.
- It helps maintain safe air pressure levels within the boat’s chambers, preventing potential damage due to excessive pressure.
.
We are pleased to offer you complimentary instructions for creating a Deluxe Soft Cushion that can be placed over your boat’s plywood or aluminum bench. This DIY project is designed to enhance your comfort and enjoyment while out on the water. The instructions are provided free of charge as a gift to our valued customers.
Please visit the web page dedicated to these instructions to access all the details and steps required to complete this project. The instructions are provided as-is, and we regret that we cannot offer additional information beyond what is already provided on the webpage.
We hope you find this DIY project helpful and that it adds an extra layer of comfort to your boating experience. If you have any questions specifically related to the instructions or materials needed, please refer to the information provided on the webpage.
To create a boarding ladder for your boat, gather 8-9 inch long pieces of 2″ diameter white plumbing PVC pipe and a piece of thick rope. Begin by drilling holes at the ends of each PVC pipe. These holes will be used to thread the rope through.
Once you have drilled the holes, run the rope through one hole in a pipe and out through the corresponding hole on the other side. Make sure the rope is securely attached and does not slide freely through the pipes.
Next, make two knots on the rope where it exits each hole in the PVC pipe. These knots will act as stoppers to prevent the pipes from sliding along the rope when you’re boarding the boat.
To make the boarding ladder functional, tie additional knots along the rope at intervals. These knots will serve as handholds to assist with pulling yourself out of the water and onto the boat.
Attach one end of the rope to a sturdy grab line or any other point on the boat that can support heavy weight. Ensure that the other end of the rope extends into the water and hangs approximately 20 inches below the water line.
When boarding the boat from the water, place one foot inside the loop formed by the pipe and grab onto the rope with both hands. Use the knots on the rope as grips to pull your body upward and inside the boat. The ladder design allows for a secure and manageable way to board your boat from the water, enhancing safety and convenience during water activities.
|
|
Please see below for proper loading of the inflatable boat:
In the event that the Bill of Sale is not included in the shipping pouch or if you require replacement documents, you have the option to download the required paperwork from our website. Simply navigate to the Downloads section and click on the link provided. This will grant you access to the necessary forms and documents that you may need for registration, ownership, or other purposes related to your purchase.
Downloading the paperwork ensures that you have the required documentation readily available and can proceed with any necessary procedures without delay. If you encounter any issues or have questions regarding the download process or the documents themselves, feel free to reach out to our customer support for assistance.
To ensure the correct positioning of the keel on your boat, follow these step-by-step instructions:
Start by deflating the boat tubes completely. This step is crucial to create the necessary space and flexibility for adjusting the keel.
Next, deflate and carefully remove the air floor from the boat. Take your time to ensure that the air floor is fully deflated and detached from its position.
Now, focus on the keel. Begin by inflating the keel to its full capacity. This initial inflation helps to identify any issues with positioning or alignment.
After inflating the keel, deflate it slightly while ensuring that you spread it out evenly on both sides. This step is important for achieving a balanced and centered placement of the keel within the boat’s structure.
Once you have adjusted the keel’s position, reinsert the air floor back into the boat. Ensure that the air floor is placed correctly and securely within its designated area.
With the air floor back in place, proceed to inflate the boat tubes to 100% capacity. Properly inflated tubes contribute to the overall stability and performance of the boat.
Finally, inflate the air floor to its recommended pressure level. After completing this step, your boat should be properly set up with the keel correctly positioned for optimal functionality and performance on the water.
Cavitation issues in boats can stem from various factors, and it’s crucial to address them for optimal performance. Here are the detailed reasons and solutions:
Propeller Issues: The first major cause of cavitation is an incorrect or damaged propeller. A propeller that is not suited to the boat’s specifications or is damaged can lead to cavitation problems. It’s essential to ensure that the propeller is in good condition and matches the requirements of your boat.
Inflation Problems: The second common cause, and often the most likely, is improper or incomplete inflation of the boat’s chambers. When the chambers are not fully inflated, it creates water disturbance under the boat tubes, resulting in cavitation. To address this, use a hand air pump to inflate all boat chambers until they are firm to the touch. Avoid relying solely on electric pumps or compressors, as they may not fully inflate the chambers.
Debris and Seaweed: Another overlooked reason for cavitation is the presence of seaweed, debris, or foreign objects stuck to the outboard motor’s skegs or propeller. Even small amounts of seaweed or debris can cause cavitation issues. To resolve this, put the motor in neutral and carefully clean any debris around the propeller. Ensure that the propeller is not rotating while cleaning.
Customer’s video about prop difference
More Info about Cavitation due to the outboard propeller:
Ventilation occurs when the propeller blades draw surface air or exhaust gases into the water stream, leading to a reduction in the propeller’s load and potential over-revving.
Anti-Ventilation Plate: This is a sizable plate integrated into the gear case housing directly above the propeller. Its purpose is to minimize the intake of surface air into the propeller blades, helping maintain optimal performance.
Cavitation, on the other hand, results from the creation of a low-pressure area in the water, often caused by a propeller blade’s movement. This occurs when the blade encounters resistance or has an irregular surface, leading to a low-pressure zone where cavitation bubbles can form. These bubbles collapse upon reaching areas of higher pressure, causing rapid pressure changes and potential erosion on the blade’s surface.
A customer shared their experience with resolving cavitation by changing the propeller pitch to an appropriate level for high-altitude lakes, which significantly improved their boat’s performance.
Another customer initially experienced cavitation issues despite what they believed was proper inflation. However, after hand-pumping the chambers until they were fully resistant, the cavitation problem was resolved, leading to improved handling and performance of the boat.
These examples illustrate the importance of understanding and addressing factors such as propeller pitch, anti-ventilation measures, and proper inflation to mitigate cavitation issues and ensure optimal boat performance.
A highly effective solution to prevent slipping on boat seats is to use non-slip stair tread tape manufactured by a reputable brand like 3M. This specific tape is designed to be durable and resistant to water, making it ideal for marine environments. You can easily find this tape in most hardware stores, ensuring accessibility for boat owners.
While primarily intended for stairs, this tape is versatile and can be applied to boat seats as well. Its non-slip properties significantly reduce the risk of slipping, especially during turns or when the boat is in motion. By enhancing the grip on the seats, it provides added safety and stability for passengers, preventing accidents and improving overall comfort during boating activities.
The drain valve in an inflatable boat is a common area where water may enter, but fortunately, addressing and fixing these issues is usually straightforward. Here are some potential reasons for water ingress through the drain valve and how to resolve them:
Incomplete Drain Plug Insertion: Ensure that the drain plug is fully inserted into its designated position. Check for any debris or obstructions on the plug and press it firmly to ensure it is securely in place.
Dirty or Debris-Blocked Rubber Seal: The one-way rubber seal that locks the valve may become dirty or have debris stuck underneath it. Gently pull the rubber seal with your finger and inspect for any debris accumulated between the seal and the plastic housing. Clean the rubber seal with acetone to remove any dirt or debris.
Imperfect or Defective Rubber Seal: If the black one-way rubber seal that locks the valve is imperfect or not fully closing the opening, it may allow water to enter. Inspect the rubber seal for any defects or irregularities. If necessary, replace the rubber seal with a new one. Replacement drain valves can be purchased from various online platforms such as Amazon or eBay by searching for “inflatable boat drain.”
Loose Drain Plug Assembly: Check if the drain plug assembly has become loose or if there is insufficient sealant under the drain valve’s outer body. Tighten the screws on the drain plug assembly carefully to avoid damaging the plastic parts. Apply a clear silicone sealant designed for doors and windows around the drain valve assembly to create a watertight seal. Replacement drain plug assemblies can also be obtained upon request.
Once the boat is in the water, it’s normal to have some water inside due to factors like rain or splashes from the outboard motor. To remove excess water from the boat, there are various affordable options available on platforms like Amazon or eBay, including manual bilge pumps, battery-operated bilge pumps, and absorbent fabrics. You can find manual bilge pumps by searching for “hand bilge pump” on Amazon.
You can improve the support and stability of the plywood seat in your boat by using a regular cooler placed strategically between the seat and the air or plywood floor. The cooler should be selected to fit snugly under the seat to ensure proper support. Look for IGLOO or Coleman coolers at department stores as they often have models that are the ideal size for this purpose. These coolers not only provide extra support but can also serve as convenient dry storage containers for your belongings.
By placing the cooler between the seat and the floor, especially in boats navigating turbulent waters or jumping waves, you can prevent excessive pressure on the strips that secure the plywood seat to the tubes. For example, a Coleman 9 Qt. Excursion cooler in Red, with dimensions of 11.25″ x 12.66″ x 9.75″ and Vendor Part Number: 6209A703G, typically costs around $15 and can be an effective solution for this purpose.
Mark shared that his boat, a 14-foot Saturn, suffered a significant 4-foot gash on the port chamber due to running over a sharp rock. Initially, the damage seemed daunting, and local boat enthusiasts doubted it could be repaired. However, Mark’s resourcefulness and determination led him to successfully restore his boat to a fully functional state.
Despite the extensive tear that extended an additional 2 feet toward the stern beyond what was visible in the provided photo, Mark took proactive steps to fix it. He enlisted the help of a local expert who meticulously stitched the damaged area from both the inside and outside, initially using 5200 Sealant to seal the larger gaps. While this initial attempt reduced leakage to small pinholes, it didn’t completely solve the problem.
Mark then turned to Inland Marine and found a specialized liquid
adhesive designed for such repairs. He applied this adhesive from the inside of the chamber and carefully spread it by rocking the boat, ensuring even coverage. After two coatings applied on separate days, he reinforced the edges
of the patch with fresh 5200 Sealant, resulting in a perfect seal without any leaks.
Impressively, Mark has been using the boat for five days without any signs of leakage or the patch peeling back, showcasing the effectiveness of his repair efforts. He expresses gratitude for the extra PVC fabric and support he received, acknowledging that the Saturn boat model has proven its resilience and dedication to pleasing its owner.
Mark’s positive experience has garnered attention and praise for the Saturn brand on Culebra, highlighting the success of his repair project and the durability of the boat. He looks for
ward to personally visiting and thanking those who supported him in Florida, demonstrating his appreciation for their assistance in restoring his beloved watercraft.
A standard jet ski trailer is highly versatile and can be an excellent choice for transporting almost any type of inflatable boat. If you’re looking for a cost-effective option, you can explore used jet ski trailers on platforms like Craigslist.com or check local classifieds. Additionally, stores like Harbor Freight Tools or Northern Tool offer affordable foldable utility trailers that can be easily modified for use with inflatable boats.
To find a suitable trailer, you can start by searching for the keyword “trailer” and then sorting the results by price to find budget-friendly options. Alternatively, you can visit a local store that sells trailers to make a purchase in person.
For further guidance and inspiration, you can watch an excellent video submitted by one of the customers showcasing their trailer setup. Additionally, there’s a blog post available that details a custom trailer project undertaken by another customer, providing insights into how to tailor a trailer specifically for inflatable boat transportation.
Furthermore, a customer has shared a nice article discussing their trailer setup experience, along with various tips and tricks they learned along the way. This article can be a valuable resource for anyone looking to optimize their trailer setup for inflatable boat use.
Overall, leveraging a jet ski trailer or a modified utility trailer can be a practical and cost-efficient solution for transporting inflatable boats, offering flexibility and ease of use for boating enthusiasts.
One of our customers shared a do-it-yourself (DIY) method for creating a specialized tool to work with NARU valves commonly found in inflatable boats. They used inexpensive “1” size PVC plumbing tube, which can be easily obtained from any home center or hardware store. The specific PVC tube used was actually a leftover piece from a previous project, highlighting its affordability and accessibility.
The DIY process involves simple filing or hand cutting to create six small grooves at the end of the PVC tube. These grooves are essential for fitting the tool onto the circular opening of the NARU valve after some sanding is done to ensure a snug fit. Once the grooves are properly filed and the sanding is completed, the tool can be slid over the six structural parts of the NARU valve, allowing for safe and easy removal of the internal valve component by turning it in a counter-clockwise direction.
Reassembling the valve is a straightforward process and follows the reverse steps of disassembly. The customer likens this DIY tool to a specialized socket tool used in mechanical work, emphasizing its functionality and utility in working with NARU valves commonly found in inflatable boats.
The choice of using plastic material for the DIY tool is deliberate, as it is more compatible with the plastic components of the NARU valve. This choice minimizes the risk of potential breakage or damage to the valve components during use, ensuring a safe and effective tool for maintaining and servicing inflatable boat valves.
To enhance stability and prevent the rolling back of two seat benches when resting against the back support of a chair, consider installing rectangular aluminum tubing between them. This tubing will serve as a rigid frame, adding structural support and preventing unwanted movement. Using wingnuts for assembly and disassembly will make the process quicker and more convenient.
Start by measuring the distance between the two seat benches where you plan to install the aluminum tubing. Choose aluminum tubing of appropriate dimensions that will fit securely between the benches. Rectangular tubing is ideal for providing stability while keeping the structure lightweight.
To begin the installation, use a drill to create holes on both ends of the aluminum tubing. These holes should align with corresponding points on the seat benches where you intend to attach the tubing. Ensure the holes are accurately placed for a snug and secure fit.
Next, insert bolts through the drilled holes on the aluminum tubing and attach them to the benches using wingnuts. Tighten the wingnuts securely to ensure the tubing is firmly fixed in place. This assembly method allows for easy disassembly if needed, making adjustments or transportation more manageable.
Once the aluminum tubing is securely in place, consider further customization by drilling holes in the seat benches to match the holes on the bottom of foldable chairs. This step is crucial for attaching the chairs to the benches securely.
You have two options for attaching the chairs to the benches:
- Direct Bolt-On: Use bolts and nuts to directly attach the chairs to the benches through the pre-drilled holes. Ensure the bolts are tightened securely to create a stable connection.
- Swivel Platform with Quick Release Mount: Alternatively, install a swivel platform between the benches with a quick-release mount. This setup allows the chairs to rotate and provides a quick disconnect feature for easy removal or repositioning of the chairs.
One of the simplest and most effective methods for attaching registration numbers to the side of an inflatable dinghy is to create a display board using a rectangular plastic board, such as one that can be cut from a FOR SALE sign or similar material. This approach offers a practical and removable solution that complies with USCG regulations, which mandate that vessel registration numbers must be visible at all times but do not require permanent attachment.
To begin, obtain a rectangular plastic board that is large enough to accommodate the registration sticker and numbers. A piece cut from a FOR SALE sign is often suitable for this purpose. Ensure the board is sturdy and weather-resistant to withstand exposure to the elements.
Next, affix the registration sticker and numbers to the plastic board. Follow the instructions provided with the registration materials to ensure proper placement and adherence. The numbers should be prominently displayed and clearly visible.
After attaching the registration information, drill or cut holes in the corners of the plastic board. These holes will be used to secure the board to the inflatable boat.
Position the board over the side of the inflatable boat, as near to the bow as possible for optimal visibility. Use plastic cable ties to attach the board securely to the safety grab rope or another sturdy part of the boat’s structure. Ensure that the board is firmly attached and will not come loose during use.
This method allows for easy removal and reinstallation of the registration display as needed. It provides a practical solution for ensuring compliance with regulations while also maintaining the flexibility to remove the display when necessary, such as during transport or storage.
Ensuring the proper inflation of boat tubes and the keel is crucial for the overall structural integrity and performance of an inflatable boat. The recommended air pressure for the tubes is 25kpa, while the keel should be inflated to 30kpa. These pressures are designed to create a rigid and supportive structure that works in tandem with the hard floor inside the boat’s hull.
The tubes and keel of an inflatable boat are engineered to provide lateral support for the hard floor, distributing weight evenly and enhancing stability. When properly inflated, they should feel as hard as rock to the touch. Any sagging, wrinkling, or softness in the tubes or keel indicates insufficient inflation and can lead to performance issues.
Insufficiently inflated tubes or a soft keel can result in excessive weight being placed on the floorboards, especially during maneuvers like navigating waves or accelerating. This places undue stress on the floorboards, which are not designed to bear the full weight of the boat and its passengers alone. Instead, they are intended to work in conjunction with the boat’s hull and keel.
A fully inflated keel helps keep the floorboards flat, minimizing stress on side rails and floorboard stringers. The tubes also exert pressure on the floorboards through the side stringers, ensuring they remain in a straight line. If the keel is underinflated or soft, it fails to provide adequate support for the floorboards, leading to increased stress on the side rails and potential damage or cracking of the floorboards.
It’s important to note that improper inflation of the boat can void warranties, particularly if it results in damage to the floorboards. Additionally, underinflated tubes can cause the stringers to shift from their intended position over the side rails, further compromising the support for the floorboards and risking damage to the boat’s structure. Therefore, maintaining proper inflation levels is essential for the safety, performance, and longevity of an inflatable boat.
During the assembly process at the factory, the bottom of each inflatable boat is stitched to a strip of PVC material. This strip is then securely glued to the inner sides of the boat’s tubes. This stitching and gluing process is standard practice and is employed in the manufacturing of all inflatable boats, kayaks, and rafts.
After the stitching is completed, it is intentionally cut, leaving the bottom of the boat inside the structure, sandwiched between the tubes. This is a deliberate and essential step in the construction process and is not indicative of any defect or issue with the product.
The purpose of cutting the stitching is to allow for the installation of the air floor or other types of flooring inside the boat. The presence of the bottom material inside the boat, covered by the air floor, serves several important functions:
Structural Support: The bottom material adds structural support to the boat, enhancing its overall rigidity and durability.
Protection: It provides a protective layer between the floor and the water, minimizing wear and tear on the boat’s interior.
Aesthetic Finish: The presence of the bottom material gives the interior of the boat a finished and polished appearance.
Insulation: In some cases, the bottom material may also contribute to insulation, helping to maintain a comfortable temperature inside the boat.
Please see below video from one of our customers for some tips and ides:
We offer the option for customers to place pre-orders for products that are currently en route on incoming containers. When we have an approximate Estimated Time of Arrival (ETA) for a container, we make these pre-orders available. The ETA refers to the expected arrival time of the container at a US port, typically either Tacoma or Miami.
Once the container arrives at the port, it undergoes unloading from the ship, which takes a few days, followed by delivery to our warehouse. Unloading the container into our warehouse, box by box, and updating the inventory into our computer system also takes additional time, typically 1-3 days. Only after these processes are completed can we proceed with shipping orders.
It’s important to note that the ETA provided by the shipping company is an estimate and may be subject to delays due to factors such as port congestion or unloading delays.
We want to emphasize that we have limited control over shipments until the container is delivered, unloaded, and processed into our system. However, once the items become available, we make every effort to ship all pre-orders as soon as possible, often on the same day or the next day. This is in our best interest to clear up warehouse space and fulfill orders promptly.
When a customer places a pre-order, it means we reserve the product for them, and it is guaranteed once the container is received. The credit card associated with the pre-order will be charged a day or two before we are ready to ship the products. Please note that we do not reconfirm orders before processing payments.
Customers have the option to cancel or delete their orders before the container is received. If additional items were ordered along with the main item on pre-order, we will ship the additional items separately once we receive the main pre-ordered item.
BoatsToGo, Inc., operating through its website BoatsToGo.com, is a prominent manufacturer and trademark holder of SATURN Boats, Rafts, Kayaks, and Paddle Boards. As the manufacturer, they oversee the production of all SATURN-branded watercraft.
Canyon Rafts, a trusted dealer listed on BoatsToGo.com’s official dealers page, operates websites under the names SaturnBoats.com and SaturnRafts.com. They are an authorized dealer based in Idaho and have a specific arrangement with BoatsToGo, Inc.
One of the unique offerings that Canyon Rafts orders from BoatsToGo, Inc. is the exclusive SATURN TRITON variation. This particular variation of SATURN watercraft boasts C7 brand valves and heat-welded seams. This exclusive variation allows Canyon Rafts to differentiate themselves in the market and implement a distinct pricing structure. Consequently, BoatsToGo.com does not directly sell SATURN TRITON inflatables.
While many SATURN boats available through BoatsToGo.com also feature heat-welded seams, they do not utilize C7 brand valves. This deliberate decision enables Canyon Rafts to showcase their unique offerings within the SATURN brand.
What sets C7 valves apart from the standard SATURN valves used by BoatsToGo.com? Both valve types share a similar pushpin design, akin to the UK-manufactured C7 valves. However, the distinction lies in the shape of the valve cap and the method of attaching the hose to the valve. Despite these differences, it’s important to note that both the SATURN boats sold by BoatsToGo.com and the SATURN TRITON variation sold by SaturnRafts.com/SaturnBoats.com are manufactured in the same factories, using identical materials.
If your inflatable boat accumulates water due to heavy rains or other factors, there are effective methods to drain it efficiently. One such method involves utilizing the one-way drain valve present on most inflatable boats.
To begin, open the drain valve cap to allow the water to escape. Allow the boat to sit for approximately 30 minutes, during which time most of the water will naturally drain out due to the buoyancy of the air-filled tubes.
If there is still residual water in the boat after this initial draining period, there’s a technique to further remove it. Open the drain valve cap again and hang it over the transom of the boat. This positioning helps prevent additional water loss while implementing the next step.
With the drain valve cap open and the boat at a high speed, the G-forces generated will push out most of the remaining water through the one-way drain valve. This action effectively expels the water from the boat’s interior.
After the high-speed maneuver, come to a stop and re-install the cap back into the drain valve to prevent any water from re-entering the boat.
Any remaining water that may be present can be easily absorbed using a towel or sponge. This final step ensures that the interior of your inflatable boat is completely dry and ready for your next adventure on the water.
An optional plywood board can be provided separately from the air deck floor for certain inflatable boats. This plywood board serves the purpose of maintaining a flatter surface on the floor, particularly in the bow area where the keel may exert pressure and cause a slight bump on the air deck.
To install the optional plywood board, first locate the two straps on the bottom side of the air deck floor. Insert the plywood board into these straps before inflating the floor. This step ensures that the board is securely held in place and provides the desired flatness.
Next, place the deflated air deck floor inside the partially inflated boat. Spread out the air deck floor so that the round opening aligns with the valve in the boat’s keel. Position the rear of the floor to touch the transom board for stability.
Proceed to fully inflate the boat tubes, ensuring they are firm and properly inflated. Then, fully inflate the air deck floor, making sure it is evenly inflated and flat across the surface. Finally, inflate the keel to its recommended pressure.
It’s important to note that the installation of the air deck floor with the plywood board should be done with the boat partially deflated. Attempting to install the floor into a fully inflated boat can be challenging and may not yield the desired results.
Two crucial points must be observed during the installation and inflation process of the inflatable boat’s components:
1. The keel should be inflated after the air deck floor has been fully inflated to high pressure, not before. This sequence is essential to ensure that the air deck floor provides adequate support for the optional plywood board. Inflating the keel before fully inflating the air deck floor may lead to the plywood board breaking and could potentially cause damage to the air floor. Such damage resulting from incorrect inflation sequence will not be covered by warranty.
2. It is imperative to fully inflate the air deck floor to a pressure of at least 60-80KPA. A fully inflated air floor is necessary to provide sufficient support for the plywood board, preventing it from breaking over the inflatable keel. Failing to fully inflate the air floor or inflating it after the keel has been inflated first can lead to structural issues and void warranty coverage for any resulting damages.
Adhering to these guidelines ensures the proper installation and inflation sequence, reducing the risk of damage to components and maximizing the longevity and performance of the inflatable boat.
Please read more about oarlock repairs in this article.
Many inflatable vessels are designed with multiple air chambers as a safety feature. In the event that one chamber is punctured, the remaining chambers allow the inflatable vessel to stay afloat, providing an opportunity for a slow and safe return to shore. It’s advisable to carry a self-adhesive patch, such as Gorilla tape or Flex tape, along with a hand pump on board for emergencies.
If a puncture occurs while on the water, it’s important not to panic. Begin by ensuring everyone onboard is wearing a life jacket. Move any heavy loads away from the punctured chamber to prevent further strain on the damaged area. If possible, apply the adhesive patch (tape) to the puncture to slow down the leak.
Once these initial steps are taken, it’s time to start the return trip back to safety. The remaining air chambers will help keep the vessel afloat, albeit at a reduced capacity. It’s crucial to maintain calmness and focus during the return journey.
A real-life example of this scenario is showcased in a video featuring an inflatable KaBoat getting punctured during shark fishing in the open ocean. Despite the challenging conditions, the KaBoat managed to safely return to shore in rough seas. This highlights the effectiveness of having multiple air chambers and emergency repair materials onboard for unexpected situations.
Customer’s video (skip to 5:15 for puncture)
Saturn boats stand out in the inflatable boat market due to several key features and benefits that set them apart from their competitors. Here’s a detailed comparison of Saturn boats with other major brands in the PVC inflatable boat segment:
Material Quality:
- Saturn uses German Heytex PVC, renowned for its durability and resistance to the elements. This material choice ensures that Saturn boats can withstand rough conditions and maintain their structural integrity over time.
Seam Technology:
- Saturn employs heat welding seams technology on most of its boat hulls. This technology ensures airtight seals, even in hot and humid conditions, providing long-term reliability and performance.
Adhesive Quality:
- Saturn utilizes German-made Henkel Loctite and BASF glue mix technology for superior adhesion and durability in the glued parts of their boats. This ensures that critical components remain securely bonded for extended periods.
Transom Construction:
- Saturn boats feature transoms covered with fiberglass layers, offering enhanced durability compared to traditional wooden transoms. The fiberglass-PVC bond is stronger and more resistant to rotting, ensuring long-lasting performance.
Warranty:
- Saturn offers a warranty of up to 5 years, matching the warranties provided by leading inflatable boat manufacturers. This commitment to quality and customer satisfaction gives buyers peace of mind regarding their investment.
Direct Sales Model:
- Saturn’s direct-to-customer sales model allows them to offer competitive pricing by bypassing dealership chains. This approach enables customers to access high-quality inflatables at affordable prices.
Now, let’s compare Saturn boats with specific competitors:
Zodiac:
- While Zodiac is a well-established brand with a reputation for quality, Saturn offers similar durability and performance at a more affordable price point, making it a compelling choice for budget-conscious buyers.
Mercury:
- Both Saturn and Mercury offer premium-quality PVC boats with heat-welded seams. However, Saturn’s inclusion of fiberglass-covered transoms and lower prices makes it a preferable option for those seeking value without compromising on quality.
Sea Eagle:
- Sea Eagle, known for its premium boats and innovative ordering processes, competes with Saturn in terms of quality. However, Saturn’s lower prices and comparable workmanship make it a viable alternative for cost-conscious consumers.
Intex and Sevylor:
- These brands cater to the lower end of the market with thinner PVC materials. While they are more affordable, they lack the durability and features found in Saturn boats, making Saturn a superior choice for those prioritizing longevity and performance.
Takacat:
- Takacat offers unique designs but at a higher price point. Saturn provides similar quality and features at a significantly lower cost, making it a more attractive option for budget-minded buyers.
BRIS Inflatable Boats:
- BRIS boats, while affordable, may raise concerns regarding warranty and build quality. Saturn’s use of premium materials, proven manufacturing techniques, and reliable warranty support make it a more trustworthy choice for inflatable boat enthusiasts.
Newport Vessels, based in California, is primarily known for its high-quality electric trolling motors but also offers a line of inflatable boats featuring plywood and air floors. Despite their reputation for quality products, the pricing of their inflatable boats, especially those with plywood floors, can be quite high, reaching almost $1500 for a 10′ boat. This raises questions about the value proposition compared to other brands in the market, such as Saturn.
When comparing Newport Vessels’ inflatable boats with Saturn’s offerings, several factors come into play:
Price Point:
- Newport Vessels’ pricing for similar-sized inflatable boats with plywood floors tends to be higher than Saturn’s. This significant price difference may lead consumers to question whether the added cost is justified by tangible benefits in terms of quality or features.
Quality and Construction:
- While Newport Vessels’ inflatable boats are generally considered high-quality, their build and construction may not necessarily surpass Saturn’s boats. Both brands use durable materials like PVC and incorporate floor options such as plywood and air floors. Without clear evidence of superior construction or materials, the higher price of Newport Vessels’ boats may appear less justified.
Customer Satisfaction and Return Rates:
- Newport Vessels’ customer satisfaction rates and return rates for their inflatable boats, especially those with plywood floors, would provide valuable insights into the overall value and quality perception among buyers. If customers consistently find better value and satisfaction with Saturn’s boats at a lower price, it reinforces Saturn’s competitive advantage.
In conclusion, while Newport Vessels is a reputable brand known for its electric trolling motors, their pricing for inflatable boats with plywood floors may be perceived as relatively high compared to similar offerings from Saturn. Without clear evidence of superior quality, features, or customer satisfaction metrics, the value proposition of Newport Vessels’ inflatable boats in relation to their pricing remains a point of consideration for prospective buyers. This reinforces Saturn’s position as a competitive and value-driven choice in the inflatable boat market, reflected in their lower return rates and customer satisfaction levels.
It’s entirely normal to notice creases, imprints, and fold lines on a brand new inflatable vessel right out of the box, just as you would with any fabric-based product. This occurrence is due to the nature of PVC fabric, which can develop these marks when tightly folded inside a shipping box for an extended period. These creases and marks are not defects or cosmetic issues but rather a natural result of the packaging and shipping process.
A crease is essentially a line or mark formed by folding or pressing a pliable substance like fabric. In the case of inflatable vessels, the fabric can develop creases, imprints, or fold lines when it comes into contact with harder objects during shipping or storage. These marks are temporary and will gradually fade away over time, especially when the inflatable chambers are fully inflated to their maximum air pressure, giving the vessel a firm and solid structure.
The process of creases dissipating can be accelerated by warm weather conditions, as the heat helps the PVC fabric relax and smooth out. Additionally, the air pressure inside the inflatable chambers contributes to reducing these fold lines and creases. It’s important to understand that these marks are part of the normal behavior of PVC fabric and do not indicate any quality defects or aesthetic flaws in the inflatable vessel.
Transporting an inflatable boat, especially when it’s deflated and packed in its carry bag, can be a cumbersome task due to its weight and bulkiness. However, there are practical solutions available to ease this process and eliminate the need for heavy lifting or assistance from another person.
One convenient option is to use a folding hand cart, which can be purchased from various retailers like Amazon, with prices starting at $29. These hand carts are designed to handle the weight and size of a folded inflatable boat, making it much easier to move the boat around without straining your back or requiring extra help.
Similarly, moving dollies available at stores like Home Depot, starting at $19, provide another cost-effective solution for transporting deflated inflatable boats. These dollies are sturdy and can support the weight of the boat, allowing you to maneuver it effortlessly inside its carry bag.
Once the boat is inflated, there are additional options to facilitate movement. One method is to place the hand cart under the boat’s transom, allowing you to push the boat with ease. Alternatively, you can invest in optional dinghy wheels that attach to the boat’s transom. These wheels make it incredibly easy to move the fully inflated boat by simply grabbing the handle at the front and pulling it in the desired direction.
By utilizing these transportation solutions, you can significantly reduce the physical effort required to move your inflatable boat, whether it’s deflated and packed or fully inflated and ready for use. These options also provide added convenience and independence, eliminating the need for a second person to assist you during transportation.
When it comes to loading a heavy inflatable boat into your vehicle, there are practical strategies you can employ to make the process easier and more manageable. One effective tip is to remove the air floor from the boat before attempting to lift it. The air floor adds weight to the boat, and detaching it can significantly reduce the overall lifting effort required.
The air floor can be stored separately, which also makes the boat more compact for transportation and storage. When you’re ready to assemble the boat, simply install the air floor back into place.
Another helpful suggestion is to create a do-it-yourself (DIY) roller platform that can assist in pushing the heavy boat bag into the back of your minivan or SUV. This can be achieved using PVC plumbing tubes arranged to roll smoothly over smaller diameter tubes. These tubes can be mounted on a rectangular piece of plywood, forming a sturdy and functional platform.
By placing this roller platform in your vehicle before loading the boat bag, you create a smooth surface that facilitates pushing the heavy bag with minimal effort. This setup reduces the strain on your back and makes the loading process smoother and more efficient.
Overall, these techniques allow you to handle the transportation and loading of your inflatable boat more effectively, ensuring convenience and ease of use during your boating adventures.
